Today I would like to talk about cable heating of water pipes. Sometimes situations arise when the water supply freezes in winter. We will talk about how to avoid this and how to heat already laid pipes with a heating cable in this article.
First I will tell you one case. Once at a small factory they asked me to supply water to one of the workshops. The water well was located 25 meters from the workshop. Between the workshop and the well there was a road covered with two layers of concrete slabs. Everything would be fine, but there was one difficulty. The road was used quite heavily seven days a week. If you start to undermine slabs and dig a trench for a water pipe, other production will stop. It was decided to lay the water supply system openly, using heating.
They immediately decided to stop using pipes. Due to the unstable power supply, the likelihood of repeated freezing was too great. We bought a multi-layer inch hose. I insulated it with several layers of mirelon. The top was covered with a channel. To warm up, we bought a self-regulating heating cable. Before connecting the water, on one side I inserted this cable into the hose through a tee. Due to the clever spring design, 25 meters of cable entered the hose like clockwork.
Why did I say - before connecting the water. The water in the well was shut off with a ball valve. So, there was a fear that if you immediately assemble the connection unit and then run the cable, it might rest against the tap. There is no need to explain for a long time what will happen next. We open the water supply, turn on the cable, it heats up, straightens and goes into the tap. It is impossible to turn off the water. Therefore, the cable did not reach the tap by about half a meter. On the other side of the water supply, a special crimp coupling is placed on the cable.
This whole thing is screwed into a regular tee. The illustration shows a skew tee, but this is not necessary. You can use a regular straight tee.

What did the operation show? In winter, in frosts down to -25, there was always water. After the accident at the substation, there was no light for three days. It was fifteen degrees below zero outside. The water naturally froze immediately. True, the enterprise stopped without electricity. After the power was turned on, the water started flowing within about fifteen minutes.
How else can you heat a water pipe with a cable?
A self-regulating heating cable can be used not only for laying inside a pipe. It can be laid on the surface of the pipe.
1. Laying can be done in a straight line along the pipe.

2. The cable can be laid on the pipe in a wavy line.

3. The cable can be wrapped in a spiral around the pipe.

The only disadvantage of heating pipes with self-regulating cables is their price. It seems to me that you can save a little by using a regular two-wire cable for heated floors. It will only have to be laid on the surface of the pipe. And the thermostat will add costs. But you can buy it in parts: first the cable, then the thermostat.
How to heat a water supply with a self-regulating heating tape
Heating the water supply with heating tape is the most effective. First, let's figure out what a self-regulating heating tape is.
In winter, private homes often experience interruptions in water supply caused by frozen pipes. Even if water supply lines are installed below the freezing point, there are still weak areas in them, which include the point of entry into the house. The problem can be solved using a heating cable for heating pipes. In this case, communications can be laid close to the surface, and more powerful heating can be organized near the point of entry into the house.
Types of cables
The modern market offers two types of cables for heating pipes: resistive and self-regulating. The work of the former is based on the property of conductors to heat up when current passes. A metal wire is used as a heating element. The temperature of the cable is constant and does not depend on how cold it is outside. It will provide maximum heating and consume the same amount of energy both at -2 ºС and at -30 ºС. To save energy during warming, temperature sensors and heat regulators, similar to those used in heated floors, are installed on resistive devices.
Another feature of resistive heating elements is that during installation they should not be allowed to intersect or be positioned close to each other. This threatens overheating and system breakdown. You need to pay close attention to this during installation.
 The manufacturer produces two types of resistive wires: single-core and double-core. The latter are used much more often. This is explained by the fact that in the first, both ends are connected to the electrical network, which is not very convenient. The two-core cable is equipped with a plug on one side, and on the other - an electrical cord with a plug for connecting to an outlet. Resistive elements must not be cut. They are laid completely, even if the length of the wires is much greater than necessary.
Self-regulating heating cables for water supply, unlike resistive ones, are able to change the amount of heat generated depending on the ambient temperature. The electrical conductors in them are intended only to conduct current, and heating is carried out using a polymer material.
This polymer has a special property: when heated, it emits less heat, and when cooled, it emits more heat, which is why the cable is called self-regulating. Such devices have the following advantages:
- Crossings and contacts of wires do not affect their operation and do not lead to burnout.
- They can be cut to the desired length, for which markings are applied to the surface of the devices. An end sleeve must be installed on the cut end.
The water supply must be insulated even with any type of heating cable installed. Otherwise, it will require too much heat to heat it. In severe frosts, the cable may not cope with heating, and the water supply will freeze.
Installation Methods
A self-regulating cable for heating pipes can be installed both outside and inside the water supply. For each type of installation there are different types of wires. Some models are designed for outdoor installation only, others for indoor use. The installation method is indicated in the technical characteristics of the products.
Installation inside pipes
Devices intended for indoor installation must meet certain criteria. The requirements for this type of installation are as follows:
- the coating does not emit toxic substances;
- devices have a degree of electrical protection of at least IP68;
- The end coupling is completely sealed.
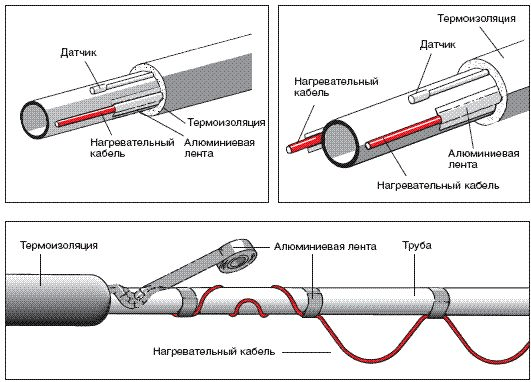
 To install a self-regulating heating cable for heating pipes, a tee is installed at the end of the water supply. A wire is threaded into one of its branches inside the pipe through the gland. The coupling, installed where the electrical wire meets the heating element, should not extend into the pipe and gland, as it is not intended for wet environments. The angle of the tee does not matter, since the cable is not secured, but simply inserted inside.
External mounting
Before installing the heating wire, the pipes are cleaned of dust, dirt and rust. Laying is done on a clean surface. Anything that could damage the device must be removed. The wire is laid along the pipes. It is fixed every 30 cm. Fixation is carried out with metallized adhesive tape or plastic clamps. The cable should be positioned so that it is adjacent to the entire area of the pipe.
 If no more than two wires are used for heating, then they are laid at the bottom of the pipes in the coldest place. They are carried out in parallel and at a short distance from each other. If 3 or more wires are installed, then they are placed so that the majority remains at the bottom. The gap between them is strictly maintained, which is especially important for resistive devices.
The wire can be installed in another way, laying the turns in a spiral. This is done by gradually unwinding the bay. Do not allow sharp bends in the cable. You can also first secure the wire with slack, and then wind it and secure it with metallized tape.

If a heating self-regulating cable is mounted on a plastic pipe, then adhesive tape is placed under the wire, which will improve thermal conductivity. On tees, valves and other connecting devices, several loops of wire are made to help protect them from freezing. In this case, you need to make sure that the cable does not bend too much.
Insulation materials
 Mineral wool cannot be used for insulation, since when moisture gets in, it loses its insulating qualities. If wet cotton wool freezes, then after thawing it crumbles into dust. Since the environment around the water supply is usually damp, such insulation cannot be used.
Materials that wrinkle under the influence of gravity should be used with caution. When compressed, they lose their insulating properties. Insulation materials such as foam rubber can only be used if the water supply is laid in a specially equipped sewer system. But if the pipe is simply installed underground, then hard materials must be used for insulation. Another option is to put a plastic sewer pipe on top of soft insulation, for example, foamed polyethylene.
A good type of insulation is polystyrene foam, which is produced in the form of pipe fragments. It is sometimes called the shell. This material can withstand loads well, has good thermal insulation properties and moisture resistance.
Required power
This parameter should be given special attention, since it depends on many factors. These include:
- region of residence;
- pipe diameter;
- method of laying the heating cable (internal or external);
- type of insulation.
Typically, each manufacturer provides a table for its products, which indicates how much cable is consumed per 1 m of pipe.
When using medium insulation (expanded polystyrene 30 cm thick), a cable with a power of 10 W/m is required for internal insulation of 1 m of water supply. If the pipe is insulated from the outside, then the heating power should be 17 W/m. These figures apply to central Russia, but the further north the region of residence is, the thicker the insulation and more powerful the heating should be.
The presence of a thermostat
 To minimize pipe heating fees, you need to install a thermostat. It is required even if a self-regulating cable is installed. Typically, heating automatically turns on when the water temperature drops to +3 ºС, and turns off at +13 ºС.
But if water is taken from a well, then its temperature will never rise to this value, so the cable will heat it even in the warm season. During the summer months, the heating wire can be turned off, but in early spring and late autumn it is dangerous to do this due to the possibility of frost. There is also no need to heat the water entering the drain tank.
This problem can be solved by a thermostat that sets the shutdown temperature to +5 ºС. Its use can significantly reduce heating costs and increase the useful life of the cable, which has a fixed service life of working hours.

At the same time as the thermostat, you need to install a temperature sensor. It is mounted on a pipe. To prevent the performance from being affected by heating, the sensor must be isolated from the heater.
The thermostat must be installed indoors. A heating cable and a temperature sensor are connected to it. The connection should be made in accordance with the markings on the device. It is better not to buy a device without markings, as its quality is questionable.
The self-regulating heating cable protects the water supply from freezing. It automatically regulates the heat generated; when it warms up, it heats the pipes less, and when it gets colder - more. To prevent the wire from heating the water in the warm season, install a thermostat with a temperature sensor.
To save pipes from freezing, they must be heated. A very simple and relatively cheap method is used for this. A heating cable is laid along them. This method can be used to heat:
- Sewer pipes.
- Plumbing with technical and drinking water.
There are many types you can find on the market. However, self-regulating has the most optimal properties. It does not require installation of an additional thermostat for its operation. It warms up even particularly cold pipe sections well. Since connecting the heating cable is not difficult, you don’t have to call a specialist, but do all the work yourself.
Before you start installing CSR, you need to take into account all the work that
carried out with pipelines:
- Electrical supply.
- Instrumental works.
Before starting installation, it is necessary to complete the installation of all tools and conduct a high pressure test of the pipeline.
Where is the cable located?
It can be mounted in several ways:
- Along the surface of the pipe.
- Spiral.
The latter option is chosen only when it is difficult to find a specific type.

Linear installation
When laying along the pipe, it should be in its lower section. Thus, mechanical damage is excluded.
Spiral installation
When you have to create a spiral installation, the consumption also increases significantly. The calculation is carried out according to a certain formula:
Amount of cable required = total pipe length x helix factor.
The spiral pitch is determined from a table that takes into account the diameter of the pipe.
Types of fixation
KSO is usually fixed to the pipe in several ways:
- Fiberglass tape, with adhesive surface.
- Aluminum strip.
In addition, it is possible to install plastic clamps. But certain conditions must be met. The permissible heating temperature of the clamp must be higher than the heating temperature of the cable and pipeline. It is necessary to maintain a distance of about 300 mm and secure tightly.


To avoid damage, do not fasten:
- Steel strip.
- Wire.
- Vinyl tape.
- Scotch tape.
Aluminum adhesive tape is used only if so specified in the project. In most cases, it is installed on plastic pipes to overcome the thermal insulation effect emanating from the plastic.
Heating cable connection diagram
Connecting CSR is quite simple. It is necessary to apply a voltage of 220 volts to the conductors of the cable. The heating end must be well insulated so that the current-carrying wires do not come into contact.
If there is a grounding, it must have a special braid.
The connection method depends on several factors:
- Where will it be installed?
- Available tools.
- Availability of consumables.
The connection diagram for any method is the same. If there is no braid, voltage is simply applied to its cores. 
The opposite end must be insulated.
 Current-carrying conductors must be reliably protected from contact with each other.
If the heating cord is equipped with a ground shield, it must be grounded. If grounding is impossible, the screen is simply cut off.


More details about the connection can be found on the website: http://zona-tepla.ru/podklyuchenie-greyushhego-kabelya/
Connecting to the network is an alternative method
We took this cable:

The heating conductor (3) and the conductors (1 and 2), through which current flows, cannot be short-circuited

- This is what the end looks like.
- Cleaned it up.
- Using this terminal block I connected it to the wire.

The opposite side must be insulated. It is prohibited to bridge the conductors. And we must ensure that they do not bridge in any environment. You can buy a special plug for this. They cost around 300 rubles apiece. But you can do everything yourself using improvised means, such as heat-shrink tubing and a heat gun.
- Thermal gun.
- Heat-shrink tubing.
- End of insulated cable.

The plug is made as follows. We put on the heat shrink tube. We warm it up with a hairdryer. Afterwards we fill the entire structure with a heat gun.

The same procedure can be done with the terminal block to which the cable power is connected. You can also wrap everything with electrical tape just in case. If operating conditions are harsh.


In which zone is it installed?
Any icing area must be equipped with a heating cable. Gutter gutters require a power of at least 300 W per square meter.
To heat drainpipes, install 2 pieces at the same time with a power of 20 W per square meter. meter.
Heating the valley roof will provide power in the range of 250-300 W per square meter. Installation is carried out at the top and bottom.
The roof eaves, made in the form of a “snake,” are heated by a cable laid along the very edge.
Table 1 (for metal pipelines).

Table 2 (for plastic pipelines).

Important:
- A cross marks areas where it is not recommended to wind the cable, as it can be damaged.
- The pipeline must be thermally insulated.
- The tables indicate the length that must be laid per 1 m of pipe. In cases where winding is required, the laying step in meters is given in parentheses.
- For those pipe diameters where flow rates are not indicated, it is necessary to use thermal insulation of greater thickness.
- The calculation of the lengths of the heating (heating) cable is valid for thermal insulation with a thermal conductivity of no more than 0.05 W/(m*K).
Be careful when laying. This will make it possible to avoid some problems.
Do not twist the wires together. A short circuit will occur.
The black polymer surrounding the current-carrying conductors must be insulated. It conducts current, so it is considered a conductor and must be treated as such.
The electrical connections of the entire system must be well insulated to prevent sparking and also to prevent fire.
Any electrical connection for the heating cable must be properly protected from moisture.
Do not use it if its heating temperature reaches the maximum value. This leads to a decrease in its service life.
If the cord is damaged, it must be replaced with a new one. Even stopping the operation of any element will make the entire system inactive.
For explosive environments, it is necessary to install only a specialized cable with special components. Similar conditions include some industries:
- Chemical.
- Petrochemical.
- Coal.
Special cables are installed for them, approved for use in this area.
If inappropriate equipment is installed, an explosion or severe fire may occur.
Water pipes located at shallow depths, as well as those passing through unheated parts of the house, need to be heated. Otherwise, there is a risk of freezing of the water supply during periods of severe cold and cutting off the water supply to the house. To solve this problem, a special heating cable for water supply is purchased, which is laid in a special way inside the pipes or wrapped around them. Manufacturers produce products of different lengths (from 2 to 20 or more meters), which allows heating only the part of the water supply system rising from the ground or the entire system located in the zone of soil freezing.
How to prepare a heating cable for pipes for connection to the panel can be seen in the video. It also explains in detail how to insulate the second end of the electrical tape to prevent moisture from entering. All the necessary consumables and parts come in a special kit, after unpacking it we begin to prepare the cable for installation.
Self-regulating cable device
A self-regulating heating cable is produced in the form of a strip electric heater, the parallel conductors of which are separated by a heat-releasing semiconductor polymer matrix. An important feature of the matrix, which is the core of the heating cable, is the continuity of heating, which allows:
- cut the cable in any desired place without fear of the occurrence of cold zones;
- increase/decrease the amount of generated heat depending on changes in temperature indicators of the external environment.
Each section of the self-heating cable is able to adapt to external conditions, and this in no way affects the operation of its other parts.
Due to the normalization of heat release for standardized conditions indicated in the name of the cable, the heating system cannot, in practice, overheat in principle. The presence of two layers of insulation allows the product to provide:
- dielectric strength;
- protection against abrasion and shock loads;
- moisture resistance;
- protection from exposure to chemical compounds.
It is important to note that a resistive cable for heating pipes is a quarter cheaper than self-regulating heating products, but they are more reliable and economical to operate. The fact is that a self-regulating cable can increase power when the temperature drops, and when it rises, it can automatically turn off.
Scheme of a five-layer heating cable design: 1 - large-section copper wires; 2 - self-regulating conductive material; 3 - modified polyolefin/fluoropolymer insulation (FS-C-2X); 4 - tinned copper braid for additional protection; 5 - external insulation made of modified polyolefin
Selecting the type of cable and calculating its power
Installing a water supply system to protect against interception and freezing allows pipes to be laid above the freezing level of the soil. In some cases, it is impossible to bury a pipeline deep into the ground for objective reasons. Pipes additionally heated by an electric cable require thermal insulation. This helps reduce heat loss and economically use the potential of the heating element. The thickness of the thermal insulation material depends on the diameter of the pipes. Recommended values for this parameter are given in the table:

Minimum thickness of the heat-insulating layer of a pipe depending on its diameter
When selecting a heating cable and calculating power, take into account:
- water pipe diameter;
- the material from which the pipes are made;
- thickness of thermal insulation;
- heat loss of the pipeline, which must be completely blocked.
Features of installing a heating system inside a pipeline
This type of installation is chosen if the water pipes are already in use and freeze in severe frosts. If you plan to install a self-regulating heating cable inside a pipe with drinking water, then you must purchase a product that has food grade approval. The sheath of these cables is made of fluorine-containing polymer, which is tested for food safety. To insert the heating cable into the pipe, a gland is required.

Installation of a self-regulating heating cable inside the pipe occurs through the gland
If it is brought into the pipe from above, then fixing its position is not required. If the heating element is supplied from below, then to prevent it from slipping, reliable fixation is required.
To install a heating cable inside a pipe, you need to accurately measure the length of the section of pipeline that needs heating. It is prohibited to lay the heating cable through shut-off valves. The installation location of the water supply heating system is marked with a warning notice.
All actions when inserting the cable into the pipe cavity must be carried out with special care and attention, since damage to its outer sheath must not be allowed. It is better to cover the threads on the fittings during installation with factory tape, like other sharp objects.
Methods for securing the heating cable
1. Along the water pipe, one cable is laid in a straight line.

2. Unlike the first method, several cables are laid along the pipeline in a straight line, parallel to each other.

3. The electrical cable is laid in a wavy line.

4. The heating cable for water pipes is wrapped around the pipeline in a spiral.

5. Several options for the location of the heating tape on individual pipeline elements (valves, elbows, flanges and other areas).

How to attach a heating cable over a pipe?
When installing the heating cable outside the pipeline, make sure that during operation there is no mechanical damage to the outer shell (chafing, compression, crossing sharp edges, stretching). The electrical cable is tightly attached to the pipe using aluminum adhesive tape. It is strictly prohibited to use plastic tape instead of aluminum tape.
First, secure the cable to the metal pipe using separate pieces of aluminum tape located at a distance of 30 cm from each other. Then the same aluminum tape is placed over the entire length of the cable, which ensures:
- lack of direct contact with the thermal insulation material;
- strength of attachment to the pipe surface;
- large heat dissipation area.
Then, with the same aluminum tape, a coupling is attached to the pipe, connecting the heating section to the supply wire equipped with a plug. The thermostat sensor is placed at an equal distance from the passing cable lines, secured with aluminum adhesive tape.
Important points to note!
- Manufacturers advise installing heating cables on water supply elements at temperatures of minus 15°C and above.
- The minimum bending diameter of an electrical cable is equal to the sum of its six diameters.
- The cable heating system for pipelines must be equipped with an RCD (residual current device), which is selected in accordance with the PUE.
- After completing the installation work, check the resistance of the heating cable and insulation.
In addition to water pipes, this product is used for heating roofs, drains, sewer pipes, etc. It is better to entrust the selection and installation of cables to professionals who know all the nuances of carrying out such work.
If just a few years ago the system for protecting pipelines from freezing was used exclusively on an industrial scale, today it is also relevant in everyday life. Such systems ensure normal functioning of the pipeline even at very low air temperatures.
Such systems sometimes prevent emergency situations associated with freezing of the pipeline, which can cause its destruction. In order to protect the pipeline from freezing, a heating cable is used.
IN heating cable for water supply Includes: electrical and heating conductors of the temperature limiter and plug. These conductors are connected by laser soldering. The cable is completely unaffected by a humid environment, since it is firmly protected by seamless external insulation.
The temperature in the pipe is controlled by a thermal limiter. If it rises to 15 degrees, it automatically turns off the power. If the temperature drops to 5 degrees, the power in the cable is restored.
Types of heating cable for pipelines:
- resistive
— self-regulating
Resistive cable- This is a fairly simple design. It has a low cost, but at the same time a large amount of electricity consumed for a relatively small area of use (for example, pipes d = up to 4 cm).
Heating cable for water supply
A resistive wire has a constant resistance value. It gives off heat in operating condition in a certain temperature range from 5 to 13 degrees. This ensures constant water heating in winter.
This type of cable includes:
- one or two heating cores
- insulation layer
— grid screen
- protective shell
A resistive wire is a wire consisting of one or more heating cores, which are enclosed in special sheaths with a screen. These are finished products - sections of various lengths and thicknesses.
Single-core wires are connected to the electrical network at both ends, because When installing, both ends of the wire must be brought to one point. Two-core wires are connected at one end.
The main disadvantage of resistive wires is constant operation at full power and the impossibility of cutting them into pieces.
Self-regulating heating cable works on complex resistance. The resistance of this type of cable varies depending on the water temperature. As resistance increases, heat generation decreases, and as resistance decreases, heat generation increases.
The self-regulating heating wire includes two parallel wires pressed into a matrix made of polymer. The resistance of this wire changes depending on changes in air temperature.
Installation of this type of wire or cable is easier because it can be cut into pieces of the length we need. Self-regulating heating cable for pipes is indispensable for complex pipeline configurations. This will eliminate the possibility of overheating as a result of temperature changes in different sections of the water supply.
Advantages of using a self-regulating wire
A wide range of applications for such wires: pipes of different diameters, as well as containers, drains, etc. Its main difference is the ability to respond to the temperature of the water in the pipeline without any additional electronic sensors.
A self-regulating wire differs from a resistive wire both externally and in the set of components:
- two copper conductors embedded in a carbon-based polymer matrix
- semiconducting matrix
— several layers of thermoplastic insulation
- braided copper mesh
- outer protective shell
Heating cable inside and outside the pipe
Advantages of a self-regulating wire:
- possibility of slicing
— ease of installation
- long period of use
How to properly install a heating cable for a water supply system
In addition to the fact that the cable can be mounted inside the pipeline, it can also be installed on top of the pipe, wrapping it around the outside. The main task is to select it so that the heat loss in the network is greater than the amount of heat generated by the system.
Exist two main ways to install a heating wire
1. External gasket- the most common use of outdoor installation. This method can only be applied if the pipeline is waterproofed, especially the section that is located on the surface of the earth. This type of installation can be done by yourself as it is not complicated.
2. Inner gasket heating wire.
This method is well used for sewer systems, and in some cases for heating systems. But it should not be used for drinking water supply.
This installation method is most convenient when installed in already installed pipelines, with limited access to it. When inserting the wire into the pipes, do not damage the insulation on the protruding elements of the parts. The wire is inserted through a coupling that is installed on the system.
When installing wires for heating pipes, the most important condition is good insulation of the wire, this can be aluminum foil or tape foil.

Installation of heating cable
Basic methods of attaching a wire to a pipe
1. Pulling the wire lengthwise into a line and gluing it with adhesive tape.
2. Hanging the wire of the required length along the pipe in the form of loops.
In this case, the wire is attached to the pipe using pieces of tape, then wound in loops around the pipe and glued with tape along its entire length.
3. Winding the cable around the pipe in a spiral and gluing it with adhesive tape.
How to choose the right heating cable for pipes
In our harsh climate, thermal insulation of water pipes alone is not enough. The choice of heating cable is made based on the tasks assigned to it.
For private houses, cottages, sewer pipes, and water pipes, small heaters are usually used. A cable with a power of no more than 50-56 W/m is sufficient. This power should be enough for the water supply to occur unhindered.
Higher power cables also require more electricity, i.e. will lead to increased operating costs. As a rule, the operating power of the heating cable and the power at rest are indicated on the surface of the product. Let's watch the video.