Decorate your home flowers from plastic bottles Anyone can do it, because a huge amount of raw material for such crafts accumulates in every household. Packages of milk, mineral water, and household chemicals are thrown away almost every day, but maybe everything will change when you see what beauty can be created using such semi-finished products. It is these examples of beautiful works and lessons on how to create them yourself that our article today will be devoted to.
DIY flowers from plastic bottles
The advantages of food-grade plastic, which you will need to work with on crafts of this kind, are its safety for our health, as well as strength and durability. Still DIY flowers from plastic bottles They will be a long-lasting decor, the colors will not fade or fade, the components will not be deformed, they will not tear or break. However, this very strength of the material can also be considered a disadvantage, because to work with them you will need not only to cut the plastic with fairly sharp scissors and a knife, but also to heat their edges over a fire to make the surface non-sharp. All this makes such work unsuitable for children's creativity, especially when it comes to young children who may cut themselves or get burned at some stage.
In addition, try to carry out all stages of work associated with heating the plastic, gluing it or hot forming it in an open space, because the substances that are released from it when heated will be harmful if inhaled. If possible, for example, if you are doing this, then it is best to carry out this work outdoors, where the concentration of harmful substances will be minimal. If after all flowers from plastic bottles for the garden you will be creating a house, it is best to open the window and check the room well after finishing work. In addition, hand gloves are also a safety issue, as when cutting, the plastic parts can be sharp enough to cut the skin, this is certainly not a fatal cut, but very unpleasant in any case.
Flowers from plastic bottles for beginners
Simple examples flowers from plastic bottles for beginners, which will be shown in this section, show us where to start mastering this technique. The most basic option, which is worth considering in more detail, is to paint the bottom of an ordinary transparent container so that it looks a little like a flower.

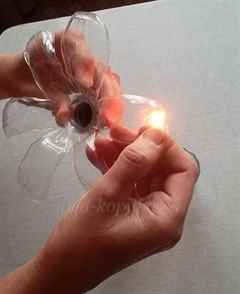
In the photo you can see one example of such a craft, which children will be happy to repeat. But, as we said above, it is best not to trust them with all the preparatory stages associated with the formation of the workpiece, but to involve them at the decorating stage. You need to take a small container and cut off the bottom evenly, as low as possible. We don’t need this extra plastic anyway; it should be left for others. We carefully cut out the petals with scissors and our workpiece is almost ready. Now, to extend the work, you will need colored plasticine and paints. Using plasticine, you need to form the center of the flower, rolling it into a ball and gluing it into the existing recess in the center. This is not only a decorative technique, but also a place for fixing fasteners - a wooden skewer, which will help us stick the finished flower anywhere, be it in a flower pot or in a beautiful vase. After the flower is already confidently standing on its wooden stem, you can paint its petals using gouache or acrylic paints. Other examples that you can see in the photo flowers from plastic bottles step by step for beginners, are carried out according to the same simple principle, but if you want to decorate them not only with paints, but also to give the petals a more natural shape, you will have to heat them with a lighter or a special burner.
Under the influence of high temperature, the plastic will begin to melt and deform, and by controlling this process and rotating the workpiece over the flame, you can achieve a very interesting appearance. Using exactly the same melting, you can not only shape the petals, but also connect the parts together.

As an illustration, the creation process is shown DIY flower from a plastic bottle step by step. You can see in the photo which part of the container will be used as a workpiece - for the lower tier we take the bottom, and for the upper tier we cut off a part from the neck. In this case, we take a small, half-liter container, so our finished flower will turn out more compact and neat. It is most convenient to cut out the upper part according to a template using an even piece of plastic. Please note that you need to heat both one and the second part, you just need to keep the lower one over the fire a little longer so that the petals take on a finished look. The color, which would make the finished bouquet even more beautiful, is applied using a brush and acrylic or other quick-drying paint; due to the fact that the material is transparent, you can paint only one side of it. It is advisable to choose contrasting, bright color combinations for both parts, the ones shown in the example, pink and blue, look great together.
Flowers from plastic bottles: photo
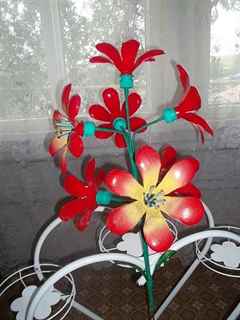
Diversity flowers from plastic bottles, photo which have been successfully proven, gives them application in a wide variety of home decor areas. As it turns out, they have no fewer options than those, and you shouldn’t just limit yourself to flower arrangements. For example, balcony flower boxes filled with colorful crafts look very elegant; in spring and winter, this will be an excellent alternative to living plants. In addition, crafts can be made not only for installation in a vase, but also for hanging compositions, for climbing vines, which also look quite attractive.

The tandem looks great, which is made on the basis of a flower and, moreover, both of these crafts are made at the same time, using one single container. The daisies that you can see in the illustration also look interesting. They differ from the classic version in that you need to cut much more petals, paint them strictly white, and in the middle either place a yellow plastic lid from a kinder egg, or make a plasticine plug. The stem is generally attached simply - a hole is made in the lid (preferably initially green or painted green), a piece of wire is inserted inside and fixed and bent. Now, when you screw the cap onto the thread of the neck, the stem will be firmly connected to the flower.

For most flowers from plastic bottles master-classes and lessons on making are quite simple. But if you want to advance your knowledge a little further, hone your technique and craftsmanship, then you can end up with the same magnificent products as in the photo above. Please note that here are the very elegant compositions and unusual jewelry that can even be used as accessories and jewelry, as well as works that can even be framed in a beautiful frame and hung on the wall, they look so artistic. It’s hard to even believe that these works are based on the same principle of recycling unnecessary plastic.

I would like to consider one example of jewelry in particular, because such a bracelet can be a successful addition to an image for a party or children's party. It is made using many flowers, each one is formed separately, and then collected into inflorescences, and then into a bouquet. To save time, you can take colored plastic, then you will skip the long process of coloring all the petals.

How to make flowers from plastic bottles
Let's look at a few simple options, how to make flowers from plastic bottles. For the first lesson we will need small ones; the plastic in them is softer, easier to cut and will be easier to paint with an aerosol can. Each needs to be cut in half and cut into equally sized petals. You can decide on your own whether to round the petals or leave them straight; both will look beautiful.

When the transparent blank begins to take on the shape of the finished flower, it must be covered with a layer of paint. As mentioned above, it will be most convenient to use an aerosol can, since in addition to speed of application, this will also give us an unusual appearance of the elements. Since you will then collect them all into a single bouquet (in our case, attach them to a hoop), it is better to paint them in different shades, but stick to the same color scheme. Let us add that it is most convenient to attach plastic using wire; for this, small holes are made in each element through which a piece of wire is pulled. This same technique, by the way, can be used for the task of decorating the top edge of any fence with such decor.

One more example DIY flowers from plastic bottles, master-the class with which is in front of you. In this case, as a result of your work, you get an excellent water lily, which can be used to decorate water compositions.
Flowers from plastic bottles master class
Our review of the wonderful flowers from plastic bottles master class, in which we can simultaneously make both a vase and the bouquet itself, and the thing turns out to be very functional and attractive in appearance. And all due to an unusual approach to decoration, because the plastic surface will need to not only be painted in the color we need, but also decorated with a pattern and fine perforations, which we will achieve if we use a regular blowtorch.


In the lesson flowers from plastic bottles step by step, which is posted above, all the main stages of forming a vase are considered. It consists of two main parts - the lower flower, the bottom, gives stability, and the upper part, twisted plastic, becomes an excellent vase, where you can even, if desired, pour water and place a living bouquet.
Plastic bottles are an excellent raw material for making various crafts. They are inexpensive and easy to find, so this is one of the most successful materials. Today we want to teach you how to make beautiful flowers from them that can decorate the interior of your home or will delight you all year round in the country.
Flowers from plastic bottles: master class
Let's try to make a flower with the beautiful name Clivia. The full name is Clivia cinnabar. This flower grows in South Africa. It has inflorescences of bright, rich color, shaped like bells. There can be up to thirty flowers on the stem, which bloom alternately and therefore delight the eye with their bloom for quite a long time.
The simplicity and beauty of clivia flowers cannot but delight. Nothing extra, everything is perfect. It seems that this plant is a messenger from distant countries, where it is always summer and a bright orange mood. Here is a photo of this flower in nature.
But you can make other crafts from plastic bottles: flowers, butterflies, animal figurines and even furniture.
Forming the middle
In order to make a pestle, take a thin wire of 20-25 cm and put an elongated bead on it. Now we bend the wire in half and put another 22 green beads on both ends at the same time. For the stamen you will need the same wire and the same length. The beads are strung according to the same principle as on a pestle, only in the amount of 19 pieces. The color of the beads in this case is blue. In total, for the flower it is necessary to make 7 pistils and 42 stamens.

To make a flower, we will need a pistil and 6 stamens. Next, we take a 20 cm long aluminum wire and attach a pestle to it with a thread, while simultaneously coating the wire with glue. We place the stamens around the pistil and wrap everything with thread in a strong layer.

Flower. We take 7 pieces of plastic bottles and cut off their top part. Now we cut each of the bottles into equal strips, rounded like flower petals. There should be 6 such strips.

Now we process the petals, holding them over the candle flame. When the plastic begins to melt, we give it a round shape. Thus, first walk with fire between the petals, then along the edge of each, holding the remaining petals.


Now we will color each piece on both sides in red. It is better to take alkyd paint and carry out the procedure by going outside. Put a glove or plastic bag on your hand and spray the paint onto the part, being careful to cover it evenly on all sides. The paint must be applied in two layers. When the red layer dries well, cover the middle of the petal circle with yellow paint.


Now we'll use a bottle cap, pierce it with an awl and widen the hole with scissors. Next, pour glue into the cork. We also glue the connection point between the pistil and the stamens and pull them through the cork. By straightening it, we give it a beautiful look. We insert the circle with the petals into the cork and wait for the glue to dry. While the glue dries, it is better to keep the flower upright in a vase or jar.


Now take green electrical tape and paint of the same color. We paint the cork into which the sepal is inserted, and when the paint dries, we wrap the entire stem of the flower with insulating tape.

Leaves
Let's take about five or six green plastic bottles and cut out the parts in the shape of leaves. Number of leaves: smallest 4 pieces, medium 4 pieces and large 8-10 pieces.

Using the same principle as we worked with petals, we process our leaves above the candle. Let's fire along the contour of the leaf, then from below along the front side to straighten the leaf. At the bottom we make a small puncture with an awl and insert the wire there. Secure with glue.


Now we wrap the wire with the leaf with the same electrical tape.
Flower assembly

Now the glue has dried. Now we fold four flowers so that one is in the center and three are on the edges of it. We bend their stems at an angle, as shown in the photo. We wrap the structure with a dense layer of thread, each layer of which is fixed with glue and green tape.

After drying, we wrap the stem with electrical tape for another 30 centimeters and place the next three leaves in the same way as described in the previous paragraph. In the same way, lubricate with glue and wrap with thread. We are waiting for the glue to dry.

Using the same principle, we attach two small leaves, then three large ones, two medium ones and small ones again.
Now all that remains is to wrap the stem with electrical tape until the very end. The flower is ready! This is what it looks like at home. Making flowers from plastic bottles is finished.

And here he is shown in his natural environment. Just like the real thing! Our instructions turned out to be so detailed that it can actually be called a video master class.

Such miracles can be created from waste material. Making flowers from plastic bottles will bring you a lot of positive emotions and pleasant impressions. And by following our instructions, you will now not only know how to make flowers from plastic bottles for the garden, but also teach others.
Video lessons for beginners
Can artificial orchids be more beautiful than living dendrobiums or phalaenopsis? Quite if the inflorescences are carefully made by hand. By creating this beauty, like living nature, the master puts his soul into it, filling it with energy, albeit inanimate, but still beautiful bouquets for decorating a home or a very special gift. Apart from the makings of decorative talent, nothing special is needed for this. Today we will “grow” bright orchids and many other flowers from plastic bottles. Surprised? Then we will immediately begin our exciting master class.
Orchids
Everlasting orchids are something out of science fiction. But making flowers from plastic bottles will allow us to defeat the laws of nature. To begin, prepare the necessary materials: several multi-colored soda flasks (milk, beer, etc.), plastic paints (acrylic, aerosol in bottles), glue for polymers, a candle or alcohol burner (a soldering iron or burner is also useful), scissors . All is ready? Then let's get to work! We will follow the step-by-step instructions:

- Based on Fig. 1, cut off the bottom of the bottle. This is an excellent planting base for an orchid - the upper petals are already there. All that remains is to adjust the shape of the 4 petals with scissors and slightly melt their edges with a candle flame;
- We continue to “grow” flowers from plastic bottles with our own hands: cut out a “false” flower from the body into 4 (6-8 - optional) petals. It can be glued to the base. Or, having made through holes in the details with a burner, assemble the orchid bowl on a decorative carnation;
- Make several inflorescences and plant them on an improvised stem - a woody twig painted green. This way you can collect large flowers from seemingly garbage. And if you work with your soul, artificial flowers will not be inferior in appearance to living orchids.
Surely you already have a decent vase for a luxurious orchid branch. No? Then make it all from the same familiar material!
Daisies
Rice. 2 clearly shows how to make daisies from plastic bottles. As you can see, the main difficulty here is the formation of the stem, stem petals and receptacle on the burner flame. However, as soon as you start working on the flower, the plastic daisy will begin to appear as if by itself - everything will be so simple. So, let's proceed step by step:

- Using a stencil or by eye, cut out the basic detail - a chamomile inflorescence with petals. At first it will be a rough blank, but then you will correct it with scissors and give it a natural look;
- Cut out various stem petals from scraps of green plastic and melt them slightly in an alcohol lamp. Thanks to this, each chamomile will become unique;
- Make a flower core from a piece of yellow (brown) plastic. Prepare the stem by carefully melting a thin strip of plastic - a twisted or straight piece of bottle - on an alcohol lamp;
- Put your craft together using the technique of soldering parts to each other. However, somewhere you can use glue.
The peduncle can be made even simpler: cut a wide strip of plastic along the entire height of the bottle and fold it lengthwise, pressing tightly. Cut off the excess planes with scissors, leaving only a thin corner - the leg is ready. Now it’s no secret to you how daisies are made from plastic bottles. Shall we move on?
Roses
Making roses yourself from plastic bottles is not only simple, but also surprisingly interesting. Each flower will be different from the others. Diagram 3 will tell you in detail how to make a garden queen. In a short time, large flowers from waste materials will bloom in your hands. Will your loved ones be able to guess what all this beauty is made of? Hardly. Let's get started soon? So:

- Look at what preparations the homemade plastic rose in Fig. requires. 3 and make 2-4 similar parts of different sizes. You can first make a stencil or cut out the components of the flower by eye, which will be better if you want to get exclusively unique crafts from plastic bottles;
- Similar to the methods described earlier, make a rose stem by slightly melting a strip of transparent plastic over an open flame. Cut out various petals from the scraps of the bottle and also slightly deform them with a candle light;
- When you finish collecting luxurious flowers with your own hands, connect all the fragments of the rose together by soldering the parts heated over the fire. Or use glue. Assemble the flower cap according to the matryoshka principle - insert smaller pieces of petals into large bowls.

The resulting craft can be used to decorate an empty shelf or window sill. Or use it for the garden. Your rose will easily take root there! From a distance, the buds are indistinguishable from real ones.
Lilies
In summer there are countless water lilies on the river, but now it will be difficult to find Red Book lilies. But we can make artificial water lilies from plastic bottles in winter, and we don’t necessarily need to look for the graceful queen of ponds. Let's make lilies right now and don't forget about water lilies:

- Taking rice for help. 4, cut out several identical blanks from the plane of a white plastic bottle (milk) with the pointed petals characteristic of lilies. Provide a hole inside the part large enough for the bottle neck to pass through;
- For another bottle (for example, yellow), cut off the neck with a margin - it will go to the core of the lily from bottles with stamens (cut the “bunch” into strips and deform them by heating). Place the white blanks with petals on the bottom onto the neck thread, and secure the assembled products with a stopper.
And water lilies made from plastic bottles are a smaller version of the same lily. Make them yellow by significantly reducing the size of the petals and rounding them rather than pointing them. You can handle this easily. Now you can even make a sunflower from plastic bottles, not like the simplest river swimsuits.
Poppies
Let's not forget to mention bright poppies in our master class. In general, homemade products made from plastic bottles are easily played up by the color of the materials and the size of the blanks. Much is done in the image and likeness. Likewise, poppies made from bottles are similar in their execution method to roses made from similar materials. Rice. 5 will not allow you to get confused if you want to make several poppies for the garden or for a combined bouquet.

And our rice. 6 will teach you how to make tulips. Here you can use various techniques, the main trick of each of which is the use of sections of the bottle that have already been given a convex shape, allowing you to cut out voluminous petals. Plastic tulips are assembled arbitrarily: with glue, by soldering melted parts, with a decorative nail, etc.


You now know how to make flowers from recycled materials. Feel free to realize your creative ideas, inspired by our visual aids. And finally, a couple of useful tricks: to prevent plastic from catching fire and becoming treacherously smoky when heated over an open fire, use lower flame levels to warm up the part. And if you can’t solder the flower parts to each other, take regular superglue and everything will work out. And don’t forget about aerosol paints in cans if you need a specific color for your craft, but you simply don’t have a plastic bottle of the right color.
1. Crafts from plastic bottles can be very beautiful - you just need to use containers made of a certain type of plastic and try to make not primitive flowers, but elegant ones.
Flowers from plastic bottles - elegant fantasies
This is proven by designer Veronika Richterova, whom we have talked about more than once and presented her work as an example of high taste (strange as it may sound when we are talking about crafts from plastic bottles), and also in this.
The master has wonderful works, looking at which it is impossible to believe that they are made of bottle plastic. I want to look at them and look at them. And this is quite possible not only in the pictures, but also if you make such garden crafts with your own hands to decorate your own plot.
So, we take plastic containers not from water or other drinks, but from shampoo, gel, and other cosmetics or detergents.
It is advisable that bottles for elegant flowers should initially be the color you want. That is, so that crafts made from plastic bottles do not have to be painted, it is unlikely that you will get a better color than it was specified during production. In addition, you won’t have to worry about the paint being washed off in the rain or peeling off in the sun. Of course, any plastic on the street fades over time. But when it fades, then paint it. At the same time, update your flower bed. For the centers of flowers, you can use decorative caps from containers.
It’s good if you have curly scissors, the blades of which give a wavy edge. If you don’t have such scissors, you will have to try to cut out the “wave” with ordinary scissors. In principle, it's not that difficult.
In principle, the pictures show very well exactly how to make such flowers. Try not to cut small elements - then you will need to fasten them, and this is not always easy. If you want curved petals, hold the piece over the fire and shape it. But don’t bring it too close to the fire - the plastic melts and burns very quickly, almost instantly.
2. But, by the way, this property can be successfully used to make a flower stem. You can simply take a rigid metal wire or rod of small diameter and, wrapping strips of plastic (here you can use regular bottle plastic), melt it.
And flowers from plastic containers are so different! Let's try to make a beautiful flower with graceful petals. It will be fantasy: for some it will remind one of cosmos, for others of daylily, for others of heliopsis, zinnia, Christmas star, etc.
Materials for 1 garden craft - flower
- plastic bottle - capacity 1 l. Please note that the best bottle options for these colors are those with smooth necks. Basically, these are bottles of mineral water;
- ball made of polystyrene foam, polystyrene foam, plastic, wood, etc. - diameter 25 - 40 mm;
- flexible metal wire;
- wire for the flower stem;
- paints.
- scissors, brush.
Flowers from plastic bottles - step by step tutorial
We use a plastic bottle, well washed and dried.
Cut the bottle in half crosswise. We try to make the cut as even as possible - this determines whether the flower petals will be the same in length. If you are making a flower with children, they may need help cutting the plastic.
Cut the plastic bottle into five or more pieces. Here we also try to cut, maintaining an even distance between the stripes - the future petals of the flower.
We take each strip with our fingers and bend it outward from the neck.
Cut out petals of the desired shape from the strips. Here they are so graceful and pointed.
It's time to paint the flower blank. Cover the table tightly with a layer of paper or old oilcloth, prepare paints and brushes.
If we buy paint specifically for painting plastic crafts, choose a glossy one - it gives a beautiful shine.
To enhance the effect, you can add glitter to the paint - special glitter. By the way, such glosses are found not only in nail polish - they are introduced into interior paints and varnishes. You can buy it in construction stores or in shops that are so loved by handicraft masters.
We make the background color of the flower with the main color (in this case, red). The plastic is transparent, you can paint the workpiece on one side, but it is better to paint both - this way the flower will look more elegant.
After the petals have dried, we draw the details with a different color of paint - we paint the tips, and put neat dots on some petals. To make it easier to draw a clear, even point, we do this not with a brush, but with the tip of a toothpick, knitting needle, kebab stick, etc.
We paint a small ball of polystyrene foam or other material - it will be the convex center of the flower.
We attach the ball to the center of the workpiece - screw it with wire, making holes with an awl, or glue it with glue for external use. For example, very good in this regard
The stem for the flower can be made from wire, painted green. Or you can buy special stems for artificial flowers in a store that sells products for florists. They are often available in wire form (called gerbera) - you can make stems of any height.
Large flowers made from plastic bottles are not uncommon, but try to “grow” huge flowers from this material and you will see how your garden has changed thanks to them.
Huge flowers look fabulous and bring magic to the world around them.
Materials for huge magical flowers
For one such flower you will need:
10-12 plastic bottles with a capacity of 2 liters or 3-4 plastic bottles of water with a capacity of 3-6 liters;
- A rim from the wheel of an old bicycle, maybe a teenager's or a child's. If there is no wheel rim, you can take a children's gymnastics hoop, and instead of knitting needles, tightly wrap wire or rope;
- durable metal rod (reinforcement) or wheel fork;
- thin flexible hose;
- paint - color depending on the color of the flower, as well as green;
- wire - for fastening. But if you have a construction stapler, this will make the job much easier.
Plastic bottles or bottles are prepared - clean and dry. Working with them is basically the same, you just get more petals from 1 bottle.
Cut off the necks and bottoms of the bottles/bottles.
We cut out large, simply huge flower petals - to the entire height of the containers.
Let's start coloring the petals. We choose the color as desired, paint that matches the look. The paints that are most often used for other plastic crafts are described here in great detail.
You shouldn’t paint the entire petal with one paint - if you make it two-color, with veins and spots, it will look more vibrant. We use one light paint, the second one is darker. You can use three colors in one product, but no more, otherwise it will be too “variegated”.
You can paint the petals on one side (the plastic is almost transparent), or on both sides.
How to attach flower petals to a base
First we make the middle of the flower. To do this, cut out a circle from plywood or use the bottom of a plastic bottle. We paint the middle in the color we need. Attach to the knitting needles in the center.
We begin to attach the petals one by one to the middle. For reliability, we also attach each petal to a knitting needle or rim.
When all the petals are in place, we mask the fastenings in the middle with thinly cut strips from a plastic bottle. By the way, the voluminous center of the flower is very beautiful.
How to make a flower stem
If there is a wheel fork, turn it into a “stem” (paint it green. If there is no fork, put a rubber/plastic hose on the reinforcing rod, paint it green and also get a stem. However, you will have to tinker with attaching the head to such a stem flower.You can make a bolted fastening or securely wind the parts with metal wire.
Huge magical flowers made from plastic bottles look great both in groups and individually. We sit them down and admire our work.
Crafts made from plastic bottles are multifaceted in terms of themes: figurines of animals, insects, and people are created from this material.
If you are going to connect the layers to the petals with wire, you will have to make holes in the plastic. You can do this instantly with a hot nail or awl. To prevent the fastening from spoiling the appearance of crafts made from plastic bottles, make holes in those places that will subsequently be covered with the next layer.
It is very easy to staple the layers together, but you will need a stapler to do this. By the way, this is a very useful household item - it holds together almost any materials.
We make the middle of the flower - to do this you need to find and attach a suitable lid to the center of the craft or use some kind of ball (tennis ball, for example), cutting it in half.
It is not difficult to attach such flowers from plastic bottles to the surface - you can simply nail them or use wire.
Plastic bottles, which are most often used to create crafts for the garden, are a convenient material in terms of cutting, durability, etc. But often the flowers from it turn out to be “flimsy”, with thin petals that scream: “We are made of plastic!”
Dense, evenly colored petals
In many cases, even coloring does not help. It’s especially offensive when you make flowers from plastic bottles: beauty seems to be implied, but, frankly, it’s not there. What to do?
You can do like designer Laura Karnitz, who creates amazing crafts for the garden and interior from PET bottles with denser plastic, namely bottles for shampoos, cosmetics and household products, milk, etc.
Another good thing about these bottles is that the plastic is already painted, and the colors are very beautiful. That is, all that remains is to work with scissors, then fasten the parts, and the craft for the garden is ready.
How to make lush flowers from plastic bottles
There are many techniques for creating plastic flowers for the garden, but there are some that allow you to make very lush heads. Here is one of them, very simple, by the way.
- Cut fairly wide strips (4-5-7 cm) from round plastic bottles.
- Cut out rather steep “waves” from one edge of the strips - these will be petals.
- Pass the petals over the fire. There is no need to “melt” the plastic too much; you just need to warm it up a little so that the petals can be bent in the desired direction.
- Now collect the strips in a “stack”, forming a flower head. More stripes - a more magnificent flower.
- Fastening - using a hot awl and wire. In principle, it will not be visible among the petals.
- Flower centers can be made using corks.
Lilies from plastic bottles
Wonderful flowers from plastic bottles are obtained not only from round containers. For example, you can make a mesmerizing lily from an ordinary flat shampoo bottle. And you won’t have to bend the petals to give them shape: you will only need to cut off the corners of the bottle - the bend is already there. If the result is not satisfactory, you can always correct the details of the flower over the fire.
Flowers from plastic bottles: Lotuses 2 options
There are two options for creating lotuses from plastic bottles: one is easier, the other is more difficult.
Lotuses made from plastic bottles - looks interesting
And, as often happens, a more complex option also gives a more interesting effect: flowers from plastic bottles - delicate lotuses - turn out lush and “full”.
Although the simple option is interesting, especially if there are a lot of flowers.
As for the material, it is better to use plastic bottles with dense, light-colored plastic - for example, milk bottles or bottles for shampoos and other cosmetic products.
Lotuses with petals in several tiers
In general, the task of creating such flowers from plastic bottles is not particularly difficult. The only thing is that you will need a strong fastening so that the lotus does not fall apart into its components (petals). If you are going to decorate some small container with these flowers and you know for sure that you will be moving them, except occasionally, you can fasten the petals into a flower with glue (hot glue, for example, or some kind of “thermonuclear” construction glue).
Such containers, which are essentially mini-ponds, are sometimes made to decorate verandas, terraces, patios, etc.
But if you do everything “for real,” spend a little time, make a hole at the base of each petal (with a hot nail) and tightly connect the petals into a flower with wire (it won’t be visible anyway).
Here's how to make the middle.
Lotuses with petals in one tier
Making these flowers from plastic bottles is as easy as shelling pears. Cut off the top of the bottle and make petals along the edge of the cut. The flower stand is also the top part of the bottle, but larger. We insert the flower with the petals with the neck into the neck of the stand, with the center inside, with the help of which the lotus will be tightly secured in the stand.
These simple flowers make wonderful borders for small flower beds.
In both cases, we paint the petals with acrylic paint (easier than aerosol, “spray can”). The color can be white or pink (like most lotuses), although if you paint it yellow and decorate a decorative pond in your garden, you will get wonderful water lily nymphs (which, in fact, are the same lotuses, but not so “glorified”).
Plastic bottles can breathe a second life into your garden plot
Plastic bottles are an easily accessible and inexpensive material. In addition to their direct purpose, there are many incredible options for their use. Plastic as a method of decoration has appealed to those who like to build something with their own hands. And this is not surprising - products made from it are quite durable, the body of the bottle bends without effort, and the strength of the material is also pleasing. With your own hands and without any problems, you can make incredible crafts for your summer house, vegetable garden, front garden and ordinary living space. So, the main task is to collect as many plastic bottles of different colors and sizes as possible, and the rest is imagination.


Sun from bottles and tires

Wasps from plastic bottles

Peacock made from plastic bottles

Wasp and flowers from bottles
Palm tree made from plastic bottles instructions
It is important to know that most tree-related crafts made from plastic bottles follow a similar pattern. You will need a plastic bottle, scissors, plastic paint and wire. The palm tree is made using the middle and lower sections of dark-colored bottles; it is advisable to make the foliage from green bottles. The next similar bottle is inserted into a plastic bottle with a cut bottom until the required height is formed. All elements are strung on a wire passing through the neck, and the neck of a green bottle without a bottom is attached to the top. Next, strips of green plastic are cut into equal parts and bent towards the bottom, imitating palm foliage.


Palm tree with sharp plastic leaves

Bottle palms in the country

Bottle palm with smooth leaves

Simple palm tree made from plastic bottles
Thus, three or more palm trees, made from such improvised material as plastic bottles, can decorate any summer cottage and garden. This decorative element will please the eye all year round; it is not afraid of rain, snow and wind. If there is a baby in the house, do not forget to melt the cut points on the bottles. In addition, do not be afraid to involve the baby in joint work. Most likely, he will gladly respond to help.

Original and bright flower beds in the garden made from plastic bottles with your own hands
It’s very easy to use plastic bottles to create useful little things for your dacha and landscape pieces, including flower beds, gazebos, supports for greenhouses and canopies, frames for climbing plants, etc.

Flowerbeds made from plastic bottles are found quite often not only among amateur gardeners, but also simply near high-rise buildings. To make a flower bed, you need to select plastic bottles of the same shape and color. If you have time and desire, you can decorate them either with one color or using a whole palette. To decorate the borders of a flower bed, it is enough to simply dig containers around the perimeter to a sufficient depth. The result is an original fence.


Flowerbed sun with sides

Fencing a flower bed or garden bed

Making a flower bed out of bottles

Flowerbed decor made from plastic bottles
Flowerpots and pots for outdoor flowers made from plastic bottles
Plastic bottles can also be used as tabletop and hanging pots. If you cut off the bottom of the bottle, you will get a cylindrical pot; if you use the top part, you will get a cone-shaped pot. If you decorate such pots with colored corrugated paper, fabric, yarn, or simply decorate them, an unforgettable element of the interior will appear. Slightly heated plastic will be easy to give to absolutely any shape, this makes it possible to create the most unusual flowers.


Pots made from plastic bottles

Hedgehog made from grass and bottle

Swan flowerbed made from bottles

Reindeer team made of bottles and tires
And here are video ideas on how you can use bottles to decorate your garden and make it more functional:
Gazebo made from plastic bottles in the country - elegant and convenient
If there is a need to build a gazebo, support for climbing plants, greenhouses, you should stock up on a large number of identical plastic bottles, as well as patience, imaginative thinking and quick wits. The gazebo is fastened using small screws. If whole containers will be used, it is advisable to fill them with sand or earth in order to add reliability. If a frame is being made, do not overload it unnecessarily. Fabric or other light protective sheets attached to the bottles to decorate the sides will look good.


House made of bottles and wood

Canopy made of plastic bottles

Gazebo made from plastic bottles

House made of cement and bottles
Decorative country curtains made from plastic bottles
Curtains made of plastic bottles on windows or doorways are an interesting design solution. To create them, you will have to take a large number of these same plastic bottles - directly proportional to the size of the window (or doorways). The cut bottoms from containers (of small height) must be connected to each other. Fishing line or thin wire are suitable as fasteners. An unusual composition of bottles can be created if you take bottles of different sizes and colors. If you have the desire and time, a curtain made of identical transparent bottles painted with acrylic paints will create an unforgettable feeling.


Decorative bottle curtains

Bottle bottoms

Bathroom curtains made from plastic bottles

Curtains made from bottle bottoms
DIY animals, birds and insects from plastic bottles
Not everyone is happy with real animals, birds and insects in the garden. Indeed, who would like it when a mole digs in the garden, a live wolf or bear wanders in, owls fly, or mosquitoes and wasps attack. But bright crafts made from bottles can easily decorate your dacha. More ideas for animals and birds made from plastic bottles in this article.

Animals from plastic bottles with photos
Making crafts from bottles is not at all difficult; anyone can find the material in any quantity, and multi-colored paints will give life to crafts. Therefore, the main problem that may arise in front of you is what exactly to do? Why not animals? Here, for example, are cats, mice and penguins made to decorate the site:


Piglet made from plastic bottles - step-by-step instructions
The easiest way is to make various animals from plastic bottles. For example, you can make these bright pink piglets and place them in your garden for decoration:

All you need is either a large five-liter plastic bottle for the piglet’s body and several regular bottles for the legs and ears. Here are instructions on how to do it:

After the pig is ready, all that remains is to paint it pink. You can make several different crafts. Here are a couple more photos for you:

DIY bottle birds
Or maybe we’ll put some kind of bird in the garden? Why not make funny crows and place them on an apple tree branch? Or make a penguin with a gorgeous tail, which you can put in a clearing or under a tree. You can also make an owl and attach it to a fence or near a hollow tree in the garden, or yellow ducks with which you can decorate a pond, also made by yourself.


Swan made from plastic bottles - simple instructions for making
And of course, the most popular bird, which is often made from bottles, is the gorgeous snow-white swan. There are several options. The simplest one is to paint the bottles white and stick the neck into the ground, forming the outline of the swan’s body - at the same time it will be a fence for a miniature flowerbed, inside which you can plant any colors. What else to make a fence for flower beds and beds from - read the link. Then all that remains is to make the neck and head of a swan - from the same bottles, from papier-mâché, corrugated tube, plaster or other materials, and this is what we get:

But there are also more complex ways. For example, you can make the frame of a swan’s body, and on top the feathers from plastic spoons - they are already white, so you don’t even have to paint them. Or cutting openwork feathers from bottles is long, tedious, difficult, but the result is really worth it, it’s not a shame to send such a craft even to some competition. And don’t forget to create a pair for the bird: you can make a white and a black swan.


And here is a video master class on how to make a stork from bottles with your own hands:
Master class: wasp, ladybug and other animals from bottles
You can also make various insects from bottles, so don’t rush to throw them away. During the winter you can collect enough material for summer crafts. The leader here, of course, is the ladybug. It’s very easy to make from the bottom of a plastic bottle, a step-by-step master class is not even required - just cut off the bottom, make a head with wire horns from the caps or some ball, paint it red or any other color, draw dots and eyes - that’s the craft and ready:
What else can you make a ladybug from for garden decoration? Read in this article. By the way, it is also easily made from plastic spoons - then you can decorate trees or a fence with them. Other insects that can be made from bottles are predatory wasps and bees, bright dragonflies or butterflies, which we will now tell you how to make.


Butterflies from plastic bottles: master class for decorating a gazebo
Bright butterflies will decorate any room; they will look especially original on a gazebo. To make these insects, you should cut out the middle of the container of a plastic bottle (the color does not matter), make a blank from cardboard in the form of butterfly wings, attach it to the plastic and trim around the edges. Next, attach the wire to the bend line. Beads of various sizes will help decorate the body of such a “gazebo dweller.” Butterfly wings are painted with acrylic paints according to the desired image. It is desirable that the color of the butterflies matches the color scheme of the resting place.


Butterflies from plastic bottles

Draw and cut out a butterfly

creative butterflies

Go for the butterfly flowers
Figures of people made from plastic bottles
If you are already comfortable with animals, let's go further and try to make something more complex, for example, human figures from bottles. For example, look at how cute the little black man was made from brown bottles, and how easy it is to make:

By the way, little blacks are a popular theme for plastic crafts. This is probably due to the fact that after winter a lot of brown bottles accumulate, which can be used for crafts without even painting them. Well, another option is garden gnomes, a man and a woman, which are also not at all difficult to make:


Flowers from plastic bottles with step-by-step instructions

Why not decorate your cottage with flowers? And not necessarily alive, although that would be an excellent option. But in addition, you can add various flowers from plastic bottles. For example, it’s very easy to make poppies from them - here’s a short step-by-step instruction:

Actually, there are no special steps here - we cut off either the bottom or the neck, depending on what kind of flower you want to make, and use scissors to form the petals. Next we paint it with varnish or paint. We make a stem and leaves from green bottles, assemble them into a single structure using glue or wire, and “plant” the flowers in the flowerbed. In this way you can make poppies and bells, daisies and gladioli, irises and roses, forget-me-nots, carnations, tulips and many other flowers that will not be difficult to recognize.


Unusual garden crafts made from plastic bottles

Flowers and insects, animals and birds, palm trees and gazebos - all these are popular ideas, but also hackneyed. And if you want to stand out, you'll have to come up with something of your own. But almost anything can be made from this material. We have selected several non-standard options for you. Of course you can use them, but the ideal would be to come up with your own. By the way, we personally really liked the bright yellow minions made from a whole bottle - despite the absolute simplicity of execution, it looks really unusual.

It’s also a good idea for those who love winter more than summer - why not make durable snowmen like these that will not only attract attention in the summer, but will also decorate your garden in the winter?

And the most interesting thing we managed to find: at the very beginning of the article, we told you that you can easily make a gazebo out of bottles for summer relaxation in the garden. But this craftsman went further and made not only the gazebo itself, but also the entire furnishings in it exclusively from bottles. These include walls, armchairs with a coffee table, a curtain, and decorative elements. What do you think of the idea?

Thus, there are a huge number of ideas for decor. The main thing for their implementation is desire and imagination, as well as the availability of plastic bottles. And they almost always leave behind plugs, which are most often not used in conventional crafts. But don’t rush to throw it away; finally, we’ll tell you how you can decorate your dacha using these same corks. In the meantime, watch the video about the 5 simplest and easiest to implement ideas on how you can use plastic bottles to decorate your dacha and garden:
We decorate the cottage with crafts from bottle caps

And it’s very easy to do - we’ll make a mosaic out of multi-colored corks. These can be animals - below there is a ready-made diagram for a cat and a dog, flowers or any other design that comes to your mind. Or you can lay out a whole panel, as in the photo above. Of course, this will require a considerable amount of traffic jams. But the plus is that you can use ready-made embroidery patterns to calculate exactly how many corks you will need and in what colors. You can decorate the walls of a house, the area around windows, a fence, a barn and any other horizontal and vertical surface with panels and mosaics made from bottle caps in your dacha. For example, why not make a doormat out of corks?


