Insulating the pile-screw foundation of a wooden house from the outside is an activity that is important to carry out to create favorable conditions inside. The procedure is quite simple, but requires certain technology and consistency. Let us consider in detail each of the stages of thermal insulation work.
Material selection
Insulation should be carried out only after the construction of the base is completed. Now the question arises: how to insulate a pile-screw foundation? The answer to this question, first of all, depends on the outcome of the thermal engineering calculation, which will show the intensity of cold air entering and indicate the required thickness and type of insulation.
Let's look at the main types of insulation material that can be used here:
- Mineral wool is the most commonly used material for facade insulation, which requires an additional waterproofing layer during installation. It is not practical for a foundation, since it loses its heat-insulating properties when absorbing moisture and requires a structure similar to a ventilated façade.
- Penoplex insulation is not afraid of moisture, pests and, therefore, does not require laying an additional layer. Its service life is long, but the cost is higher than mineral wool.
- Polyurethane foam is a foam that is applied to the surface using specially designed equipment. When dried, it takes the form of a continuous material without gaps.
- Thermal panels perform not only an insulating, but also a finishing role. It has a lot of advantages, but there is a drawback - it is high cost, but it is compensated by the fact that you do not need to buy decorative finishing material.
- You should not use polystyrene foam, as it will quickly deteriorate and require replacement.
In addition to the insulation itself, finishing material will be required. The most commonly used siding is aceid and plinth panels. Thermal panels do not require finishing material, which explains their ease of installation. To install the sheathing, you need to prepare bars, boards and screws.
Pile-screw foundations are used primarily on heaving soils with unstable soil. The peculiarity of the design is that the weight of the entire house is transferred through screw piles to the lower layers of soil, which are more stable than the upper ones.
The classification of a pile-screw foundation depends on the height of the grillage: low, high, intermediate. When living in a house all-season, insulation of the foundation, as well as its blind area, is required to retain heat.
 Technology for insulating blind areas and foundations
 How to insulate a foundation with decorative panels
This type of foundation can be insulated with sheet or loose insulation. The structure must additionally be insulated by constructing a warm blind area. The insulation of the grillage must begin with marking and preparing a trench, the width of which will be slightly greater than the thickness of the selected insulation material.
Next, you need to clear the base of debris and install a waterproofing layer. Now you can proceed directly to the installation of insulation. It will require preliminary preparation of special fasteners (dowels), as well as polyurethane foam.
 The technology of insulation with bulk materials and base panels or thermal panels consists of the following stages:
- Dig a trench, the width of which should be in the range of 0.5-1 m, and the depth should be slightly greater than the depth of the pile support pad.
- Make a sand cushion 200 mm thick, which should be compacted well.
- Install the frame for fastening the panels. When using a wooden frame, it must be treated with an antiseptic.
- Install polystyrene foam.
- Fill the trench with loose insulation, which also needs to be compacted. It is important when filling not to reach the ground level by 50-100 mm.
- Install and secure the base panels, deepening them slightly into the loose insulation. If you use thermal panels, then installing insulation is not necessary.
- Fill the blind area with an inclination angle of at least 10˚. For this, a regular cement mortar consisting of cement, water and sand is used.
For a pile-screw foundation with an intermediate grillage, it is more advisable to use thermal panels, since there is no need to bury the material in the soil composition. It is attached directly to the pre-mounted sheathing.
Method of insulating the base with bricks
This type of foundation is the most common. Here, insulation of the space under the structure is extremely necessary. The technology of the process is to create a false base. For manufacturing, brickwork is used or a lathing is created from wooden boards, onto which the insulation is attached. 
In order to make a false base based on brickwork, you must follow the following steps:
- On all sides of the foundation, it is necessary to prepare a trench 20 cm deep and a width that should be several centimeters greater than the thickness of the prepared brick.
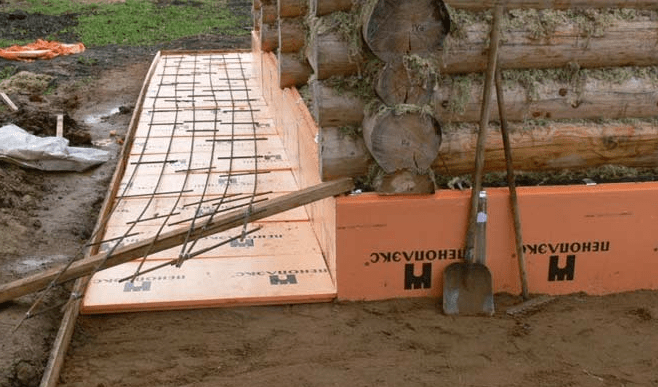
- The resulting trench must be filled with concrete mortar and additionally reinforced with reinforcement with a diameter of 10 and 12 mm.
- After the concrete base has hardened, you can begin laying bricks.
- After the masonry is completed and completely dry, insulation can begin. When working with expanded polystyrene, it is important to use only special construction adhesive that does not contain organic solvents, for example Ceresit CT83.
You can make a base from brickwork without pouring a foundation for it. To do this, you need to weld a 120 metal corner to the bottom of the piles and lay masonry on it. If you plan to use facing bricks, please note that for proper and effective insulation it is necessary to deepen this false foundation into the ground by 10-15 cm to prevent freezing and heat loss. If you plan to use ordinary brick as a frame and then finish it, then you don’t have to deepen the corner, but instead deepen the foam and finishing panels into the ground.
An important aspect in insulation technology is the installation of foundation vents.. They will allow you to ventilate it, avoiding dampness under the house and as a result of the appearance of fungus on the boards and rapid rotting of the material.
The foundation on screw piles is becoming increasingly popular when constructing support foundations in problematic soils (heaving and deeply frozen soils; high groundwater levels at the building site). Houses on screw piles can last a long time, but a distinctive feature of pile-type foundations is the reduced thermal insulation characteristics of the building being built.
To improve the thermal insulation of a pile foundation, it is necessary to install a basement fence that reliably isolates the space between the building and the soil.
Base insulation: technology and methods of work
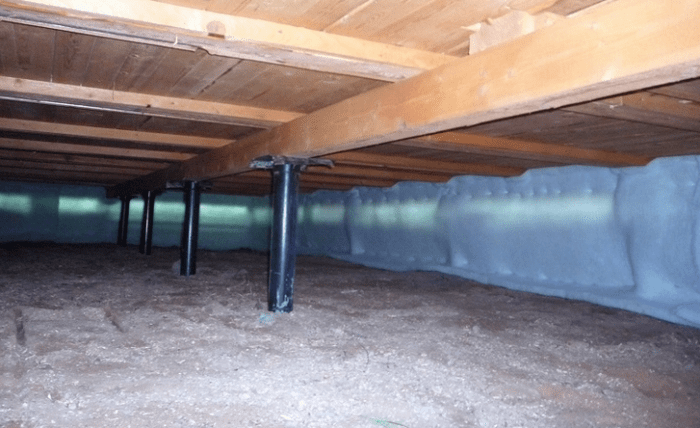
The open space between the soil surface and the grillage significantly worsens the technical characteristics of the premises of the first floor of a house on stilts: there is a significant drop in temperature in winter; cold air masses contribute to the occurrence of drafts and condensation on the structures of a residential building, increasing the cost of heating the building.
Base construction technology
According to the technology for performing work on insulation of pile-screw foundations, first you should build a base, and then begin to perform insulation using any of the existing methods.
The construction of the basement of a house built on a pile-screw foundation can be done in certain ways:
- First, you need to lay the walls covering a row of mounted screw piles, the height from the line of the existing blind area to the lower belt of the house.
- Arrange a fence (false base) on a frame base with external cladding.
Laying the plinth belt
 Red brick is most suitable for the base belt
 For laying the plinth, only red ceramic brick is used, which is most resistant to high humidity.
The masonry is done in half a brick; first you need to prepare the foundation, for which you dig a trench around the perimeter of the building of the following dimensions:
- Depth – 0.30 m.
- Width – 0.250 m.
The bottom of the trench is carefully leveled, the excavation is filled with coarse sand to a height of approximately 0.10 m, after which the sand mixture is compacted with periodic wetting. A narrow reinforcement frame (mesh) of longitudinal and transverse rods is laid on a carefully compacted base, after which the structure is filled with concrete mixture.
It is important to complete concrete work in 1 day, which will ensure the strength of the structure without the formation of rough seams.
After the concrete mortar has completely hardened and gained sufficient strength, the construction of brick walls begins.
Pickup: building it right

The installation on a pile-screw foundation is arranged as follows: first, metal rods are welded to the pile heads, which will serve as guides for fastening the panels. The next stage of work is welding the vertical strips of the fence frame. Then the foundation cladding panels are attached to the planks. It is very important to ensure that the lower edge of the facing panels does not come into contact with the ground surface. Coarse sand is poured under the lower edge, and a slope away from the house is provided to drain rain and snow water.
The foundation of a house on stilts should be protected by laying rolled waterproofing along the backfill, and when gluing the protective rolled carpet, it should have a lower outlet, which is inserted into the sand bedding and then covered with a laid blind area.
Methods
Houses on screw piles necessarily require reliable insulation of the foundation. To ensure a comfortable microclimate inside a building on screw piles, it is necessary to perform a number of technological operations that help improve the heat-saving characteristics of the screw-pile foundation.
Insulation of a pile foundation made of screw piles can be done in the following ways:
- Thermal protection device for the base along the outer perimeter of the building.
- Internal insulation of the basement of a building on a foundation made of screw piles around the perimeter.
- Insulation of ground floor floor structures.
External base insulation technology
 Penoplex for external insulation of the base
 If it is necessary to insulate the base from the outside, proceed as follows:
External brick walls are leveled and treated with a deep penetration primer for better adhesion to the insulation.
For insulation, slab materials are used, the best of which are polystyrene foam and penoplex. Penoplex, unlike conventional polystyrene foam, has increased technical characteristics for resistance to excessive moisture. The material is characterized by low flammability, does not deteriorate from low temperatures in winter, does not cause allergies and other diseases, and provides high heat conservation performance.
The slab insulation is strengthened using a special adhesive. The joints between individual slabs are sealed with special care using polyurethane foam.
If the smallest gaps and cracks remain between the slabs, this will facilitate the penetration of moisture into the structures, causing the formation of condensation, rotting and the development of mold.
A reinforcing mesh is strengthened over the laid layer of slabs, the base is plastered, after which finishing is carried out in any way that will coincide with the finishing style of the external facade of the building.
Technology of internal insulation of the base
 Expanded clay - material for internal insulation
 The basement floor of a pile-screw foundation can be insulated from the inside, for which the following technology is used:
Brick walls are insulated from the inside in the same way as from the outside, only they do without finishing the base of the pile-screw foundation. Insulation is considered complete after laying a metal mesh over the insulation layer. It is very important to lay a protective layer from the inside of the basement floor, which is added to the base. The base of a pile-screw foundation can be insulated with sand or expanded clay; in this case, expanded clay is a more reliable insulation for the basement of a pile-screw foundation.
Insulation of floors on the first floor
It is possible to insulate the floors of the first floor in a house with a foundation made of screw piles by installing several layers of waterproofing and insulation using the following technology: skull blocks are laid on both sides of the joists, on which a subfloor made of boards is laid. Wooden products should be treated with an antiseptic. A layer of waterproofing, vapor barrier, insulation is laid on the subfloor, another protective layer is sound insulation and a finished floor made of boards. It is allowed to install a finishing coating of finishing materials for the floor on top of the boards. Insulation of the floors of the first floor is considered the most reliable type of insulation of buildings on pile foundations made of screw piles. Watch the video to see what mistakes you should avoid when insulating your floor.
In conclusion, I would like to note one nuance of insulating a foundation belt made of piles - in the basement it is necessary to provide openings in the opposite walls for ventilation of the basement floor.
This is necessary to prevent the accumulation of vapors and condensation in the basement. Natural ventilation of the base will reduce the risk of premature corrosion of piles and other metal structures, and will also reduce the risk of the spread of mold and mildew, which greatly harm wood flooring.
In modern construction there are many types of foundations. Each of them has its own characteristics and main functions. But the most universal foundation, suitable for almost any climatic conditions, is considered to be the pile-screw type. This foundation is a metal, pile-beam structure. It protects the structure from groundwater, soil deformation and transfers the load to dense layers of soil.
Why insulate a pile foundation?
In areas with problem soil, where there are areas with floating layers of soil, the optimal solution for building a house would be a pile-screw foundation. It will provide reliability in places with high groundwater levels, in contrast to strip monolithic or prefabricated foundations.
The pile-beam structure and dynamic loads are not afraid. It is very durable and resistant to soil heaving. It is also not afraid of the destructive effects of groundwater, since the screw piles are made of anti-corrosion steel.
Another advantage of this type of foundation is its relatively low cost, as well as the speed and ease of construction. Installation of one pile foundation by a team of experienced specialists will take only one working day.

But, despite the series positive qualities, the pile-screw foundation has a number of negative features. The house, built on stilts, does not have a basement, and also has poor thermal insulation parameters.
There is a space between the floor and the ground that is easily blown through. This is precisely why precious heat leaves the house very quickly. This is especially noticeable with the onset of cold weather. Radiators don't do their job because warm air always rises and the floors remain cold.
To solve this problem, you need to think about it at the stage of designing a house - thermal insulation. Insulation of a pile-screw foundation occurs at the stage of working with a grillage in order to completely isolate it from external air flows. Finished houses can also be insulated, but it will not be as effective as thermal insulation during the construction stage.
Also, for high-quality and effective insulation of a pile-screw foundation, it is necessary to install a false base. It should prevent wind and precipitation from entering the free space between the soil and the house.
Materials for foundation insulation
When insulating a pile-screw foundation, it is necessary to pay attention to the false base and grillage. These elements come into contact with the surface of the house and, when frozen, can transfer low temperatures to it. The screw piles themselves, immersed in the ground, do not need to be insulated.
When insulating a false base, it is necessary to select a material that is not afraid of water and retains its thermal insulation properties even in a damp state. After all, a large amount of moisture comes from the ground, which means that the insulation will be in a very humid environment. It must also be resistant to various salts and minerals found in the soil. It is better to use high-density sheet materials or a liquid heat-insulating mixture when insulating a pile-screw foundation.
The most popular materials for insulating a pile-screw foundation are:
- Styrofoam;
- liquid penoizol;
- foam glass blocks;
- extruded polystyrene foam or polystyrene foam.
Penoplex and foam plastic have the same thermal conductivity and also do not allow vapor to pass through. Penoizol also has similar thermal conductivity, but allows moisture to pass through. It is better not to use mineral wool and basalt insulation, as they are not very convenient for installation.
Do-it-yourself insulation of a pile-screw foundation
You should start insulating the foundation only after the grillage of the house has been waterproofed. Waterproofing membranes are perfect for this. The most budget-friendly option may be roofing felt or similar bitumen-based materials.
Attention! It is necessary to cover with waterproofing not only the upper surface of the grillage on which the walls of the house will be built, but also all its other parts along with the pile heads.

For the manual construction and insulation of a false base, the following tools are required:
- welding machine;
- trowel, spatula, hammer, tape measure, knife;
- low speed drill or screwdriver;
- concrete mixer.
The false base of a pile-screw foundation does not bear any load, since its main task is to isolate the free space under the house from external factors.
The first option is to build a brick wall under the grillage. Its thickness should be half a brick. The second option is to cover the free space with decorative panels that are attached to the grillage.

Creating a brick plinth
This option is more labor-intensive, but the effort will not be in vain. Since the brick base is as reliable as possible and has greater durability, while the decorative alternative is easily damaged.
Before erecting and insulating the basement, it is necessary to dig a trench around the house under the grillage. The depth of the trench should be 20-30 centimeters, and the width should be slightly larger than the brick.
The trench should be filled with concrete mixture and allowed to harden. This will be a kind of foundation on which the brick plinth will be laid. Due to the shallow depth of concrete, reinforcement with a reinforcement diameter of 10-12 mm should be used.

After the concrete has completely set and hardened, you can begin to build the walls of the brick plinth. It should be laid in small sections 1-2 meters long. This is necessary in order to simplify the insulation on the surface of the base.
To secure the material chosen for insulation, you will need specialized adhesive compositions that should not contain organic solvents.
Advice! A good option for fixing the material to the surface of the base is Ceresit CT83 glue.
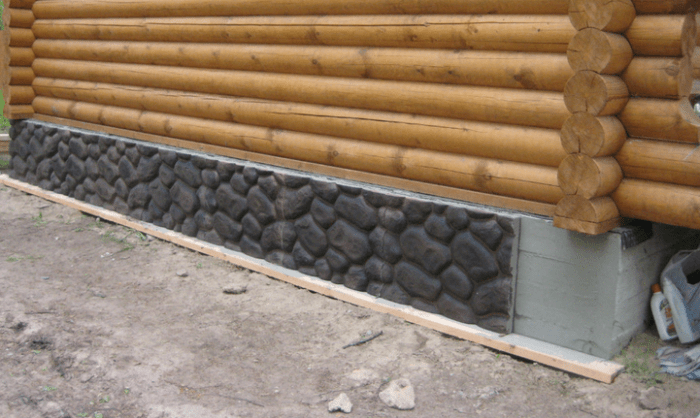
After insulating the base, you need to cover the brick wall with a decorative cap. There is a huge selection of materials to suit everyone’s preferences. You can also use plaster.
Creating a plinth with decorative panels
A much simpler way to construct and insulate a false base, as opposed to constructing a brick partition, is to install decorative panels. If you approach this issue seriously and competently, this method will provide durable and reliable insulation of a pile-screw foundation.
First, you should start choosing a supporting structure on which the decorative panel of the false base and the material chosen for insulation will actually be installed.
Advice! A good option when constructing a false base would be a frame made of a metal profile welded to the screw piles of the foundation.
The distance between the guide profiles depends on the height of the free space between the floor of the house and the ground. Usually two or three longitudinal profile frames are sufficient.

A wooden beam will also do a good job as a frame, but it must be treated with an antiseptic or mastic in advance. The main thing is to protect the tree from rotting and insects.
Next, the frame cavities are filled with insulation. Foam plastic, penoplex or any other insulation. Do not forget about the thickness of the slabs if penoplex is used for insulation. If it extends beyond the grillage, it will greatly complicate the installation of decorative panels.
After installing the thermal insulation material, a decorative fence should be installed on the grillage of the building using an adhesive mixture. The size of the decorative panels is also an important aspect. To ensure reliable fixation, it is necessary that the lower part goes into the ground to a depth of about 5 centimeters, and the upper part fits tightly to the grillage. In the place where the lower part of the panel contacts the ground, you need to dig a small ditch 10-15 centimeters deep and fill it with expanded clay.
Expanded clay filler has low thermal conductivity, which will eliminate the possibility of the structure freezing at subzero temperatures. Consequently, this will also help reduce heat loss from the floor of the building.
The choice of this false base option for a pile-screw foundation with vapor barrier materials (penoplex) implies the presence of natural ventilation. It is needed to prevent moisture from accumulating in the internal space. Because of it, condensation will settle on the inside of the floor of the house, which can negatively affect the wooden structure. In order to allow air to circulate freely, you need to make special holes for ventilation. With the onset of cold weather, the holes should be closed with a plug or any heat-insulating material.
Work is carried out on the surface of the grillage. Roofing felt is used as a waterproofing material. It is laid in the gaps between the grillage and the building itself.
The surface of the piles and grillage must also be treated with mastic that does not allow moisture to pass through.
- Installation of thermal insulation means. After selecting the material to work with and calculating its parameters, you can proceed directly to installing the thermal insulation layer.
Using an adhesive, sheets of thermal insulation material are applied along the entire perimeter of the grillage and along the surface of the piles.
Waterproofing materials must be firmly secured. For this purpose, polyurethane foam is used, placed in the seams between the plates of material.
- Carrying out external cladding. Various types of decorative tiles are used as materials. So, you can use materials that imitate brick or natural stone. For cladding you can use marble, granite, porcelain stoneware. As a budget option, profiled sheets or siding panels are used.
Covering the base is necessary to protect it from external environmental influences and damage to the surface of the thermal insulation.
Creating a decorative base
Technology
How to insulate a pile screw foundation by creating a base? The technology can be divided into several stages:
- Choice of material (the sequence of further actions depends on this decision);
- Creating a frame (what it will be depends on the type of insulation);
- Working with joints;
- Products.
Let's move on to choosing the material.
Materials
The material for insulating the base of a pile-screw foundation will be in contact with the ground and therefore must have sufficient hydrophobicity. Most often, extruded polystyrene foam is used for such purposes. The material has a low thermal conductivity of 0.04 W/m2. In addition, this insulation has zero vapor permeability - it did not allow moisture to enter the frame. However, for the sake of fairness, we can talk about several more options.
- Polyurethane foam (PPU);
- Penoizol;
- Foam glass;
- Mineral wool with high hardness.
The latter is rarely used, it requires steam and wind protection and has no special advantages for use near the ground
Since polyurethane foam is applied by spraying, it requires a solid frame, made, for example, from a board.
They also use brickwork, but this is more likely not insulation, but part of the frame, which means more about that later.
Installation
In the “Technology” section, the second item is the creation of a frame. If the frame is brickwork, then the wall is built according to the usual principles of construction and insulated like a brick wall. But this method is rarely used because it is much more expensive. More often a sheathing frame is erected.
- A guide is attached to the grillage along the entire length of the wall or joined together from several elements;
- The lower guide is attached to the blind area;
- After this, transverse guides are attached in increments along the length of the slab;
- Expanded polystyrene sheets are placed on foam adhesive from the inside of the profile;
- On the outside, corrugated sheets, cladding panels or CBPB sheets are attached;
- All cracks between the EPS boards are filled with the same foam.
Having completed all these steps, you will significantly insulate the space under the house. In addition, the frame with insulation will serve as wind protection. Before this, the wind was blowing between the piles. But now, in any case, the space must be ventilated. Therefore, usually in two places, using an angle grinder, vents are made, onto which a ventilation grill is placed or special opening doors are made
Do not forget about this important point at the insulation stage.
Carrying out basic calculations
Before starting work, a preliminary analysis should be carried out. To obtain accurate calculations on the parameters of the thermal insulation layer and calculate its effective thickness, it is necessary to first make the following measurements:
- Building perimeter
- Room area
- Living room area
- Degree of load on the base
- Parameters of the screw piles used
- Number of people living in the building
- Features of the local climate
- Freezing level of the earth's surface
Only after taking into account all the above factors can you accurately calculate the required amount of thermal insulation material and the thickness of the layer used.
Internal floor insulation on a pile foundation

Insulation of the floor on the described base is carried out in several stages. vapor barrier for the floor is laid on the outside over the entire area. Insulation like expanded polystyrene is installed on top, which is sheathed with boards. This floor can be used as a finished basement ceiling.
For hydro- and wind protection, modern moisture- and wind-insulating membranes can be used. They are easy and quick to install, but the cost of multi-functional products may put you off.
All elements of a wooden house on stilts are treated with a composition with antiseptic properties
It is important not to forget about the vapor barrier for the floor. It can be a polyethylene film, which is laid on a layer of heat-insulating material
When installing vapor and thermal insulation, you should not leave gaps between individual elements. This can lead to the formation of cold bridges. In this case, the insulation under the floor can quickly deteriorate during operation. To further protect the interior from the cold, you can use particle boards, floorboards or sheets of plywood, which do not conduct heat well.
Base made from piece materials
Brick, building blocks (aerated concrete, foam concrete and foam concrete), and foam glass are suitable for constructing a basement. In the latter case, the material itself serves as a good heat insulator.

For masonry made from piece materials, it is necessary to create a strip foundation made of reinforced concrete. To do this, a trench about 20 cm deep is dug around the perimeter of the house. If the house is located on a slope, in order to reduce the material consumption of the structure, the strip foundation is stepped, keeping the surfaces horizontal.
After the concrete has set, a wall of piece materials is laid out. If we are talking about brick, then for a low-height plinth, a half-brick thickness of masonry is sufficient. For a full-fledged basement floor, it is necessary to prepare a more solid foundation and lay out walls one and a half bricks thick.
It is important to take care of high-quality waterproofing between the concrete foundation of the plinth and the masonry, as well as between the masonry and the grillage - the horizontal supports between the piles on which the wall structures of a wooden house rest. For waterproofing, roll bitumen material is used - roofing felt or its analogues, laid in two layers
Floor insulation
To achieve maximum effect from insulating the foundation, it is also necessary to insulate the floor. Therefore, finally, I will tell you how this procedure is performed:
- First of all, you need to lay the subfloor. It can be done in two ways - hem sheets of plywood or other sheet material from below to the joists, or attach slats (rough bars) to the bottom of the joists and lay the sheets on them, as shown in the diagram above;
- then an overlapping waterproofing film is laid on the joists and subfloor. For greater tightness, the joints should be taped;
Insulation of the floor in a frame house on stilts with mineral mats
- Next, thermal insulation material is laid on the waterproofing. It is best to use mineral mats for these purposes. It should be noted that the insulation must fit tightly to the joists so that there are no cold bridges;
- then another layer of thermal insulation is laid on top of the insulation.
Now you can lay boards or other floor covering on top of the joists. Thanks to all these manipulations, the floor in your home will remain warm even in the cold season.
Insulation technology

Creating a fence - the very structure that will replace the base.
You can carry out thermal insulation of a pile-screw foundation on your own. All that is required is accuracy and quality materials. The essence of the work comes down to creating a durable structure that will serve as a base. It is this structure that will be subject to insulation.
The order of work is as follows:
- Waterproofing the grillage - lintels connecting the piles into a single structure. This stage is required regardless of the material from which the main structural elements are made. At the joints of the grillage with the wall and piles, roofing material is laid. Metal parts are coated with water-repellent mastic or liquid rubber. Wooden structures are treated with an antiseptic. Read more about insulating the foundation of a wooden house here.
- Creating a fence - the very structure that will replace the base. It is made of brick, wood, or simply creates a metal frame onto which facing panels are attached. The fence will protect the insulation and the space under the house from wind, rain, snow and other adverse phenomena. All further insulation work is carried out from the inside of the partitions.
- Installation of insulation. Foam plastic, penoplex, or any other moisture-resistant material can act as thermal insulation. The slabs are mounted with glue with careful insulation of the joints. You can use foam glass or airgel - these are more modern materials that do not require additional waterproofing. Ideally, it is better to apply polyurethane foam to the entire surface of the fence around the perimeter. This will strengthen the structure and provide wind and moisture protection. And it will be more difficult for rodents to get through such a barrier.
- Powdering of the basement structure. The inside of the fence is sprinkled with gravel, crushed stone, and earth.

It will be more effective to use sprayed polyurethane foam.
In case of extreme financial starvation, the entire space between the base of the foundation and the surface of the earth can be covered with soil. It's cheap and easy, although ineffective.
Before you insulate a foundation on piles, you need to correctly assess your strengths. You will have to work in cramped conditions. The material is mounted from the inside, and if the distance between the soil and the grillage is small, then it is unlikely that it will be possible to glue the sheets accurately and accurately. It will be more effective to use sprayed polyurethane foam. Firstly, you don’t have to crawl under the house yourself - c. Secondly, such thermal insulation is guaranteed to be smooth and seamless. All gaps between structural elements will be carefully sealed.
PPU from Ecotermix is considered the best among other insulation materials. We recommend watching a video about insulating an attic foundation below:
How to insulate the foundation of a house from the inside
The most popular insulation materials on our market today are mineral wool, as well as foam plastic and penoplex. Mineral wool, due to its ability to absorb moisture, is considered a lower-quality insulation of the foundation of a house from the inside. When using it, additional waterproofing is required. The relatively new material penoplex has a higher thermal protection coefficient and strength compared to polystyrene foam, but its price is significantly higher.
After insulation, the space under the grillage is filled with light and warm material - expanded clay, which significantly reduces the ventilation of the subfloor. Sometimes ordinary earth is poured instead of expanded clay, but the thermal protection of this method is not as effective, although it is much more economically beneficial.
Waterproofing device
If all measures for proper waterproofing are not carried out, the metal from which all structural elements are made may undergo corrosion. Wooden elements can be affected by fungi and rot.
Loss of characteristics of piles or wood can significantly affect the service life and durability of the building.
In order to protect the structure, one of the waterproofing materials is laid at the point of contact between the pile elements and grillages. For example, this could be a layer of roofing felt. It also needs to be placed on those edges of the grillage that meet the wall of the building.
Following this, the entire foundation is treated with waterproofing mastic, and the wooden parts are treated with an antiseptic.
After a week, after the solutions are completely absorbed, the next stage is insulation of the foundation.
Waterproofing works
Do not forget that waterproofing work on a screw foundation is one of the stages of arranging thermal insulation. They are carried out in order to prevent moisture from entering the joint between the grillage and the piles themselves.

If waterproofing is not carried out, the foundation of the house will not withstand for a long time. This is due to the fact that its metal parts will become corroded, and the wooden parts will begin to rot. This can be prevented using such a well-known material as roofing felt. It should be placed at the junction of the ends of the piles with the beginning of the grillage. They should also cover the top of the grillage itself - where it comes into contact with the wall.
Also, waterproofing a screw foundation involves applying a special mastic to all metal parts. At the same time, wooden structures are impregnated with a solution that prevents the process of rotting in a humid environment. Only after these substances have dried can you begin to insulate the pile foundations of the house.
Strip foundation
First, they dig a trench all the way to the bottom of the foundation. Its width is 80-100 cm, since the blind area is also insulated at the same time. If the foundation is of a recessed type, then the first 40 cm deep trench is dug to the width of the blind area, and then, to save effort, you can make it 50 cm wide.

If the house was built some time ago, cracks may appear in the concrete. They are covered with a mixture of cement and construction adhesive if the cracks are small. Larger damage is repaired with cement mortar.
The next step is waterproofing. To do this, the surface of the foundation tape is covered with bitumen mastic, onto which roofing material is glued. The sheets are glued overlapping, the seams are additionally coated with mastic. More modern roll materials are also used, such as self-adhesive roll waterproofing.

After this, the insulation is glued. Although penoplex is often attached to dowels, it is still better to give preference to glue or liquid nails - they do not violate the integrity of the sheets. How to insulate a strip foundation with polystyrene foam, watch the video:
The joints between the sheets are foamed with liquid foam.
After installing the insulation, geotextiles are glued onto it. It will reduce the effect of soil heaving on the heat-insulating layer.
Next, the trench is backfilled to the level of the blind area. Sand and small crushed stone are poured under the blind area in a layer of 0.15-0.2 m, and the cushion is thoroughly compacted. This layer will protect the blind area from loads arising from soil movement. A layer of dense insulation is placed on top. The same penoplex is suitable due to its resistance to compression loads. Concrete is poured on top; it can additionally be reinforced with mesh.
Attention! To reduce the effect of frost heaving, the insulation layer is placed at the level of the base of the foundation. The most effective combination of penoplex insulation up to the level of the walls in combination with insulation of the blind area at the level of the sole.
.
Base insulation

Insulating the base of a pile foundation allows you to make the interior space more comfortable. First you need to build a base, and then begin insulation using any of the existing methods. The construction of the plinth is allowed in certain ways. You can lay a wall that will cover a row of screw piles. The height of the wall should be equal to the length of the line from the blind area to the lower belt of the house.
You can arrange a pick-up, which is a fake plinth. It will be built on a frame base and will have an external cladding. If you chose the first method, then the masonry must be done in half a brick. The products will be red ceramic, as they are most resistant to high humidity.
First, you must prepare the foundation, for which you dig a trench around the perimeter of the building. The depth and width will be 0.3 and 0.25 m, respectively. The bottom is well leveled and filled with coarse sand. The layer thickness should be 10 cm. After this, the sand mixture is compacted and moistened.
A reinforcement frame of longitudinal and transverse bars is laid on such a base, after which the concrete mixture is poured. After the concrete mortar has hardened and gained strength, you can begin building a brick wall.
Pile foundation
How to insulate the foundation of a wooden house on stilts? For a pile foundation, as for a columnar foundation, a fence is built - an imitation of a base, closing the space between the piles. This will already reduce heat loss to some extent. For effective thermal insulation of a pile foundation you need:
- arrange a basement,
- insulate it inside and out,
- insulate the floor.

You can build a thin brick wall around the perimeter, or you can use slab materials that are attached to the sheathing. If you choose the option with a brick wall, you need to pour a shallow concrete strip 20 cm thick on which the wall will be built. It is not necessary to use ceramic bricks; you can take foam blocks or foam glass.
Important! The space under the floor should not be sealed. After installing the intake, it is necessary to make vents in it - ventilation holes measuring 10-15 cm
They are placed evenly on all sides of the house so that they are opposite each other.
To fasten panels or slabs, a sheathing is made from a metal profile or wooden blocks. For example, DSP can be used as outer cladding. There are already insulated facade panels that perform decorative and thermal insulation functions.

A shallow trench is dug under the casing, into which a layer of sand (2-3 cm) is poured, expanded clay is placed on it, and the trench is covered with earth on top, so that there is no gap between the soil and the casing.
The video shows the structure and insulation of the false base:
To insulate a pile foundation, use
- expanded polystyrene,
- Styrofoam,
- foam glass in blocks,
- liquid penoizol (urea foam).
The first two options are most often used. Foam glass is too expensive for a private home, and liquid foam insulation requires special equipment or the work of specialists, which is also expensive. It’s easier to insulate the foundation of a wooden house with your own hands using polystyrene foam or expanded polystyrene from the outside. The main thing is that the material does not absorb water, so mineral wool will not work here. The foam is glued to the adhesive foam; for reliability, you can use additional wooden planks, which are attached with self-tapping screws to the sheathing through the foam.
Important! It is advisable to attach polystyrene foam or polystyrene foam to the guides, and not between them. In this case, there will be no gaps or cold bridges, since the thermal conductivity of wood, and especially metal, is greater than that of foam plastic.

You can insulate a pile foundation with polystyrene foam or EPS from the outside or the inside. If this is done outside, then the insulation is attached before finishing. If the finishing is already attached to the base, for example, if these are facade panels or DSP boards, then the insulation is mounted from the inside.
Floor insulation
To insulate the floor in a wooden house on a pile foundation, I usually use mineral wool, basalt wool, expanded polystyrene, foam plastic, and liquid insulation.

Thermal insulation is done during the construction and installation of the floor as follows:
- They make a subfloor on which the insulation will lie.
- A vapor barrier and windproof layer is first placed on the sheathing.
- Then they put insulation.
- Vapor barrier and waterproofing are placed on top.
- After this, a finishing floor is constructed.
The layer of mineral wool must be at least 10 cm. If it is necessary to lay wool in two or more layers, this is done in a checkerboard pattern (so that the seams do not coincide). The video shows floor insulation in a house on a pile foundation.
For waterproofing, you can use glassine, polyethylene, isospan, and wind- and moisture-proof film. Polyethylene is the cheapest option, but it is not the best.
Important! In a wooden house on a pile foundation, it is imperative to treat all wooden floor elements with an antiseptic.
The insulation of a columnar foundation differs little from the insulation of a pile foundation; the same materials and techniques are used.

How to insulate a pile screw foundation with your own hands
The process can be divided into 5 main stages: waterproofing a metal structure, making a frame for attaching thermal insulation, installing insulation with a waterproofing film if necessary, attaching decorative panels to the base of the house, installing an insulated blind area around the perimeter of the house, filling with soil or expanded clay inside the foundation of the house. Let us consider these stages in more detail below.
1. Waterproofing a pile foundation
Regardless of the material of the grillage - wood or metal, careful waterproofing is necessary so that moisture from the soil does not penetrate into the structure, leading to corrosion of the metal and rotting of the wood. It is necessary to protect with roll or liquid waterproofing all parts of the structures where thermal insulation will be performed. The wood should be treated with antiseptics, and the metal frame should be treated with bitumen mastic.
To create a heat-saving cladding between the ground and the facade of the house, it is necessary to create a structure that imitates the base of the house. This structure can be made from light brickwork on a shallow foundation. The brick base is insulated from the outside with foam or penoplex slabs and sheathed with siding or panels. You can create a frame from timber or metal guides.
2. Making a basement at home

Photo. Pile foundation insulation scheme
To make a brick plinth, you need to pour a shallow reinforced foundation up to 20 cm deep. After the concrete has hardened, a red brick plinth is laid out. Thermal insulation boards are attached to the outside of the brickwork using polystyrene foam and polystyrene foam adhesive. The insulated brickwork of the pile foundation is sheathed with decorative panels that imitate natural stone or brickwork.
The second method, a frame made of timber or metal, is a simpler and less expensive method. It consists of attaching horizontal guides to piles using bolts or welding. Thermal insulation slabs are fixed between the guides; the joints should be treated with polyurethane foam. Next, decorative panels or siding are mounted on the outside guides. On our website you can calculate the thickness of the insulation for the base using a heat engineering calculator.
3. Thermal insulation of the basement of the house

Covering the basement of a house with PVC panels
When independently insulating the facade with mineral wool or the basement of a house on a pile-screw foundation, a distance of 10-15 mm less than the width of the insulation should be left between the guides. In this case, the mineral wool will fit tightly between the guides, leaving no cold bridges. Mineral wool should be covered with waterproofing; we remind you that the vapor barrier should be placed on the insulation with the correct side.
When insulating a foundation on screw piles with penoplex or expanded polystyrene, the seams between the slabs should be foamed with polyurethane foam. If the characteristics of penoplex guarantee that the material will not absorb moisture and will not be damaged by rodents, then the foam slabs should be protected from rodents and possible mechanical damage. You can cover the insulation on the base of the house with vinyl or metal siding.
4. Fastening decorative panels
To cover the base from below, it is necessary to secure the starting profile for siding along the entire perimeter of the house. Then siding panels or decorative PVC panels are attached from the bottom up from the starting profile. This facing material will protect the insulation on the pile foundation from precipitation, mechanical damage and the penetration of rodents. Do not forget about additional waterproofing of the facade under the siding.
5. Filling with soil or expanded clay

Photo. Vents in the basement of the house (ventilation holes)
The inside of the insulated pile-screw foundation can be filled with soil or expanded clay - this will additionally insulate the underground space of the house. An insulated blind area should be installed outside the building to reduce freezing of the soil under the house and reduce heat loss from the house during the heating season. Ventilation holes (vents) should be made in opposite sides of the base, protected from rodents and insects by grilles.
Ventilation holes serve to remove moisture from the subfloor of the house; in winter, the ventilation holes should be covered with rags. At the end of the material, we have posted video instructions from experienced builders on the issue in question, how to do it yourself insulate the foundation on screw piles bathhouse or country house to resolve all possible questions.
Insulation on the facing base
The procedure for insulating the cladding in the general case is as follows:
- Installation of supports for sheathing on piles
- Construction of sheathing
- Fastening cladding and insulation
As a rule, the sheathing on screw piles is made of wooden boards - it is most convenient to fasten the cladding sheets to them. This requires solving the problem of attaching wooden elements to pipes.
A good way is to install special brackets and a metal profile on the piles, to which the sheathing boards are screwed. If the pile pitch is large, vertical wooden posts can be installed. Lathing for extended sheet materials, such as metal or vinyl siding, is usually installed in the form of boards located parallel to the ground with a counter-lattice made of bars. Sometimes, for example, in the case of cladding with corrugated sheets, only vertical bars are sufficient.
 Installation of lathing for basement insulation
Obviously, the insulation must first be secured so that it is protected from the outside by the facing slabs.
Monolithic slabs are usually chosen as insulation. If mineral wool is used, they must be fixed on both sides, which is inconvenient due to the small height of the base and the difficulty of working from inside the perimeter.
Today, the most popular material for insulating foundations is penoplex. It has a dense structure, like expanded polystyrene (foam), is lightweight, cuts well and is easy to install. Actually, penoplex is extruded polystyrene foam. It has higher thermal insulation properties than regular foam, although it is more expensive. The thermal conductivity of penoplex is 0.029 W/mk, which is lower than that of polystyrene foam (0.038 W/mk). A sheet of penoplex with a thickness of 30 mm completely replaces in its properties a sheet of expanded polystyrene with a thickness of 50 mm. In addition, penoplex does not allow moisture to pass through, unlike looser foam.
 Standard sheet foam
Other materials are also widely used for insulation:
- Liquid penoizol sprayed onto a continuous sheathing
- Foamed glass produced in blocks.
The sheet insulation is attached either with self-tapping screws or simply glued to the sheathing.
After attaching the insulation boards, it is necessary to protect the joints from the formation of cold bridges - that is, glue them with tape or, best of all, foam them with liquid sealant.
It should be noted that non-extruded foam does not perform well in cold temperatures. Its pores can accumulate moisture, and frozen water gradually destroys the material. In this sense, extruded foam plastic does not suffer from low temperatures.
When installing insulation, we must not forget about ventilation of the space under the house. It is imperative to leave ventilation holes, called vents. In addition, it is recommended to leave a gap (5-7 cm) between the bottom of the cladding and the ground surface. This is necessary in order to minimize the effect of frost heaving of the soil. During finishing, this gap is closed with a blind area.
From the inside, a fine metal mesh must also be applied to the insulation, which will protect the material from rodents.
 Base insulation scheme on stilts
Perhaps the main mistake– remember the need for insulation after construction. In this case, it will turn out to be much less effective, most likely more expensive and labor-intensive. There is also a chance of damage to the foundation structure, which can lead to problems in the operation of the house or even its destruction.
Despite the fact that many insulation materials themselves are quite resistant to water, are not destroyed by it, and sometimes do not leak at all, this does not mean that traditional waterproofing should be neglected. Protecting the foundation from moisture is the key to its long and safe operation.
- After completing the insulation procedure for the base of the building, it is necessary to wait at least 7 days to strengthen it. Then you can begin installing the waterproofing layer.
- Don't forget about installing ventilation. The ventilation openings must be strictly opposite each other with a pitch of at least 1.5 or 2 m.
- To prevent destruction and shifting of the soil, do not move, move or try to unscrew the foundation pile supports. This can lead to its complete destruction.
- To strengthen the base and increase the level of its reliability and strength, you can lay a layer of reinforcing mesh.
- If the procedure is carried out correctly, the space inside the base can be used for various household needs (underground, shed, warehouse, storage space for household supplies, etc.) In this case, communications can be installed into the room. Thus, you get an additional technical floor in your own home.
As you can see, the procedure for strengthening a pile foundation by thermal insulation is accessible to almost everyone. It can be easily done by any builder. There is no need to resort to the use of specialized equipment or acquire additional theoretical skills.
Video. Insulation of foundations on screw piles
New publications
- How to insulate a potato box on the balcony
- How to insulate a house from the outside and how to do it inexpensively
- How to insulate a roof to prevent condensation
- How to insulate a door in an apartment with your own hands
- How to insulate the facade of a wooden house with your own hands


New comments
- Stanislav. You know, theory is theory, but practice is needed in such things, my brother built a house for himself, we read together wow.
- Victor. Thanks for the article, very informative. However, I am strongly concerned about the correctness of insulating the foundation with mineral wool.
- Igor Gennadievich. Great article. The entire technology for insulating strip foundations is described in detail and clearly. For.
- Ailis. Thank you for the article! We have developed cracks over time. We ordered a specialist from Biplane, he came, did everything, for.
How best to insulate a foundation on stilts
When choosing the optimal insulation option, you must be guided by regulatory indicators and the possibility of using all acceptable options
At the same time, attention should not be diverted from the economic effect.
You can lay and insulate a strip foundation around the perimeter of a house on stilts. This will be a reliable option. The rooms will be warm and cozy, but the process will affect the cost of the work. As an option, a shallow tape is poured. Thus, you won’t have to spend money on complex work, and additional manipulations will protect your home from the cold.
- Izospan: a universal insulating material
- How to properly waterproof a basement?
You can cover the piles with any building material and fill the underground space with expanded clay. The option is inexpensive, but not entirely effective and is suitable for places with low levels of moisture in the soil.
In fact, there are many options with which you can insulate a pile base and there is no point in listing each one. Over the years of using pile foundations in house construction, experts have developed their own “recipes” and suggest considering the following methods in this regard:
- External insulation relative to the perimeter of the building. The method is in demand if the foundation piles do not rise too much above the ground. The process consists of erecting a frame along the base, insulating the basement space and external cladding.
- External insulation on the floor. If the house is on “difficult” soil, this is the only option. Essentially, the floor is insulated without basement finishing and .
- Combined insulation. In this option, the basement box is mounted externally, and insulation is also carried out in the basement.
On a note. The third option is preferable but a little more complicated. When implemented, high thermal insulation and reduced dependence of the house on the cold are guaranteed.

Scheme of insulation of the pile base.
First of all, waterproofing. This is the basis of any work related to reducing the temperature load on the building material and the entire house as a whole. The purpose of creating waterproofing is to prevent the formation of condensation on piles, grillages and places of contact of metal components with wood. In these cases, bitumen mastic is used. The composition is coated with all joints and foundation pillars.
Is thermal insulation necessary?
Many builders want to save as much as possible on work, so they often refuse such necessary measures as waterproofing and insulation.
When wondering whether it is necessary to insulate the foundation, you should take a closer look at its design.
The fact is that this type of plinth is a system of pillars installed under the building. However, there is a lot of free space between the pillars. This serves as a source of accumulation of cold air flows, which leads to a general decrease in the thermal conductivity of the entire building.
To avoid this, it is imperative to carry out the insulation procedure. We figured out why to insulate the foundation. Now let's take a closer look at the object of work.
2 Technology of insulation of a pile-screw foundation
All work on insulating the foundation begins after the grillage of the house is covered with waterproofing material. As protection against moisture, special membrane films are used, or, if the budget is limited, ordinary roofing felt.

Insulation of a pile-screw foundation with penoplex
Waterproofing covers both the upper part of the grillage, on which the walls of the building will be placed, and the lower and side parts, and the heads of the piles adjacent to the grillage.
To create an insulated false base with your own hands, you will need the following tools:
- Welding machine;
- Concrete mixer;
- A screwdriver for insulating a base with polystyrene foam;
- Hammer, trowel, spatula, tape measure, stationery knife.
2.1 Creating an insulated brick base
The first option is more labor-intensive, however, the result will be as reliable and durable as possible, while decorative panels are quite easy to damage.
To install a brick base under the grillage of the house along the entire perimeter of the building, it is necessary to dig a trench 20-25 centimeters deep and several centimeters wider than the size of the brick used.
The trench is filled with concrete, which, after hardening, will serve as the foundation for the brick plinth being created. Considering that the depth of concrete is minimal, it is necessary to reinforce the base with reinforcement with a diameter of 10-12 mm.

Brick foundation base on screw piles
After the time required for the concrete to completely harden, we begin to build a brick plinth. The wall must be laid in sections of 1-2 meters, so that foam panels can be conveniently installed on the inner surface of the plinth.
To attach penoplex with Izospan AM, it is necessary to use a special adhesive composition that does not contain organic solvents. Ceresit CT83 glue has proven itself well.
2.2 Creating a plinth from decorative panels
Installing a panel false plinth is much simpler than building a brick wall. With the right approach to its arrangement, this technology for insulating a pile-screw foundation will be durable and reliable.
First of all, you need to take care of the supporting structure to which the plinth panels will be attached. To do this, it is necessary to weld a guide frame made of a metal profile around the perimeter of the house to the piles.
The pitch of the guides is determined based on the height to which the house is raised above the ground; as a rule, 2-3 longitudinal profiles are quite enough. You can also use a wooden beam as a frame, but it must first be impregnated with an antiseptic, which prevents the wood from rotting.
Insulation boards (extruded polystyrene foam or penoplex) are attached to the supporting frame. It is necessary to select the thickness of the slabs so that they do not protrude beyond the grillage, since the decorative panel will be attached to it.

Wooden frame for attaching the fence
It is important to select the size of the panel so that its upper part, with which the panel is glued to the grillage, ensures reliable fixation of the structure, and the lower part penetrates 4-5 centimeters into the soil (you must first dig a small groove).
From the place where the fence and insulation come into contact with the soil, you need to remove the soil to a depth of 10 centimeters and add expanded clay sand.
Expanded clay has low thermal conductivity and will not allow the structure to freeze in the cold season, as a result of which the heat exchange between the floor and the pile-screw foundation will be minimal.
The technology for arranging an insulated false base of a pile-screw foundation with vapor barrier Izospan V requires natural ventilation, which is necessary to prevent excessive dampness of the air under the house, moisture from which will condense on the inner surface of the floor, which can lead to rotting of the wooden structure.
To ensure air circulation, it is necessary to create ventilation holes. One vent on each side of the house is sufficient. In the cold season, the vents are closed with heat-insulating material or plugged with a regular rag.
2.3 Technology for arranging an insulated base on screw piles (video)
Thermal insulation work general information
 Membrane film for basement waterproofing
Work on thermal insulation of the pile foundation of a house or bathhouse should begin after covering the grillage with waterproofing. Special materials are used for waterproofing: films membrane type, which is shown in the photo above or roofing felt. Moisture-resistant material must be used to cover the top of the foundation pad on which the walls of the house or bathhouse are located, as well as the side and bottom parts of the grillage and the pile heads that adjoin it.
You can study in detail the process of waterproofing the grillage and pile caps of the screw base in the video:
Before you move on to building a false base with your own hands, you will need to prepare a set of tools. You will need:
- gas welding machine;
- concrete mixer;
- a screwdriver that will be used to secure the PPS;
- standard tools for construction work.
An insulated base can be equipped in two ways: by creating a thin brick wall directly under the cushion of a house or bathhouse, or by installing ready-made decorative panels that are placed on the cushion.
Base on sheathing
To reduce the cost and speed up the installation of the base, you can make it from sheet materials. Typically, moisture-resistant central fiber boards or decorative panels are used for this; corrugated sheeting is also suitable.

The sheathing is made of metal or wood. Metal elements can be welded to the foundation piles. The wooden elements are fastened using bolts in two ways:
- the lugs for the bolts are welded to the piles, and wooden blocks are attached to them;
- The basis for the horizontal guides are vertically located bars attached to the grillage, while there should be a gap between the ground surface and the bars.
To prevent the penetration of moisture from the soil into the sheathing material and wooden sheathing, a shallow trench is dug under the future plinth (along the entire perimeter). A layer of sand (2-3 cm) is poured onto the bottom and compacted, then a layer of expanded clay is poured. A layer of earth is poured on top of the expanded clay so that there is no gap left between the surface of the soil and the base.
Construction of a false base
Regardless of the chosen option, the first thing you need to do is arrange a false base.
Types of structures:
Light brick wall.
Intake from decorative panels.
The first type is labor-intensive to implement. However, this allows you to obtain a reliable and durable design.

Creating a brick plinth requires pouring a small concrete foundation
On our website you can find contacts of construction companies that offer. You can communicate directly with representatives by visiting the “Low-Rise Country” exhibition of houses.
The procedure for constructing a brick wall under the frame:
First, a trench is dug along the entire perimeter of its placement with a depth of 20-25 cm. The width is made with a small margin relative to the size of the brick used. Concrete is laid inside the finished trench: given the shallow depth of the foundation, it is additionally reinforced with steel rods 10-12 mm thick.
After the concrete has completely hardened, you can begin laying half a brick. It needs to be built in sections of 1-2 meters: this will create convenient conditions for carrying out internal insulation.
It is recommended to use ceramic brick as a material for a false brick base, which, unlike silicate brick, copes well with moisture. Tape cladding is usually used on non-heaving soils.
Picking up the panels is much faster. Steel guides are mounted on top of the screw piles using bolts or welding. The number of profiles depends on the height of the above-ground part of the piles (usually 2-3 pieces).

A false plinth made from panels is created faster, but it is not as reliable
To simplify further installation of the selected skin, vertical jumpers are attached over the guides. The cladding is made of siding, corrugated sheets, decorative panels or DSP. Corner areas are decorated with overhead corners and drip edges. To avoid the destructive effects of ground moisture and frost heaving, the fence is made slightly elevated above the ground. The size of the damper gap is in the range of 5-15 cm. During finishing, it can be closed with a decorative strip.
Regardless of what type of false base is used, it must be equipped with ventilation holes to protect the interior from excessive accumulation of moisture. The optimal locations for the holes are the opposite sides of the structure.
Problems of uninsulated pile foundations
For low-rise construction The most suitable are solid reinforced concrete piles, steel screw piles and bored concrete piles. Regardless of the design of the piles, the method of their installation and the grillage installation technology, this type of foundation has a number of disadvantages.
Disadvantages of a pile foundation:

A pile foundation that is not insulated during the cold season can lead to big problems
- Cold underground. Increased heat loss through the floor in winter.
- If the grillage is made of reinforced concrete, then a powerful cold accumulator is created. If there are interruptions in heating, it takes a very long time (up to several days) to restore the normal microclimate in such a room.
- Danger of freezing of utilities laid under the floor.
- Pushing out piles caught in the freezing zone. Piles are a conductor of cold. If anti-frost measures are not taken, metal and concrete supports can cause local heaving.
- Uneven shrinkage under the weight of the house when individual piles fall into areas of low soil density.
- From an aesthetic point of view, a conventional pile foundation is a purely utilitarian design solution that requires decoration.
- The emptiness under the house, blown by the winds, quickly becomes littered and periodically requires time to restore order under home.
Why are individual piles pushed out, leading to a situation where the plane of the grillage is disrupted? One of the common reasons is uneven soil moisture: it is stronger around the perimeter and corners than in the center. This, in turn, leads to uneven freezing depth. In addition, specific expansion during heaving also depends on the percentage of humidity.
4 of the 7 problems listed in the list are directly related to exposure to cold and can be solved with the help of a competent thermal insulation device.
Use of expanded polystyrene
Thermal insulation of foundations involves in most cases the use of a material such as extruded polystyrene foam. It is distinguished primarily by its noise and heat insulation properties, which makes it one of the best options for this type of work. The sheet of material is only about 3 centimeters, which saves internal space that fills the base.

When insulating with polystyrene foam, you must follow the following instructions:
- If the wall is made of concrete or brick, all cracks should be eliminated first. To better hold the sheets on the foundation, it should be treated with a primer.
- Using special glue, sheets of polystyrene foam must first be glued to the inside of the basement. In some cases, they should additionally be secured with special umbrellas in the form of dowels. This will help prevent the sheets of material from becoming deformed.
- The joints of expanded polystyrene sheets must also be treated with glue. This will prevent cracks through which cold air can enter in the pile screw foundation.
- If the house is wooden, it is best to carry out two-layer insulation.
- A metal mesh should be glued to the top of the sheets. It will help prevent rats and various insects from creating holes in them.
- Blowing can sometimes occur under a wooden house even when polystyrene foam is used. Therefore, it is worth adding soil or expanded clay to the structure from the inside.
Such thermal insulation can make the basement of the house as comfortable as possible in winter.
Beginning home craftsmen often wonder which insulation to choose - mineral wool or polystyrene foam. The first option has pros and cons. Among the advantages are non-flammability, resistance to chemicals, ease of material when bending corners, resistance to temperature changes, high levels of sound and heat insulation.
But this solution also has its downsides. Among others, it is worth highlighting:
- sagging;
- moisture absorption;
- carcinogenicity of formaldehyde resins;
- inconvenient installation;
- decrease in the effectiveness of thermal insulation over time.
When thinking about the question of which insulation to choose - mineral wool or polystyrene foam, you must remember that the first solution is possible, but requires care during installation, protecting the material from contact with the room and proper waterproofing. .
Stages of insulation
- Waterproofing of grillage and pile racks.
- The frame is assembled - a structure that replaces the base and serves as the basis for finishing.
- Installation of decorative finishing material on the base.
- Installation of insulation from the inside of the entire structure, eliminating cracks and spaces between sheets.
- Sprinkling with expanded clay, crushed stone or soil of the basement structure to strengthen it.
Installation of heat insulator
Note! This is an accessible, cheap, but ineffective method. With this method you will simply achieve partial sealing of the space, there will be no drafts and the floors in the house will become a little warmer, but you may not expect the desired result
Therefore, it is better to purchase material that has a low price but good performance.
- Polystyrene foam or its analogues have all these qualities. Thermal insulation is laid from the bottom of the grillage to the first floor of the house. It should be noted that there should be a gap of about a week between waterproofing and thermal insulation work. This is necessary so that the glue or mastic is completely dry.
 Covering the base with siding.
- The next, final stage can be considered the final finishing work. After all, the insulation needs to be protected not only inside, but also outside, and the finishing will also have a decorative function. Anyone who is familiar with construction and knows how to insulate a foundation on screw piles will advise you on a lot of materials suitable for these purposes.
The most inexpensive and simple finishing materials include ordinary profiled sheets. But it is not attractive enough, so if you have the opportunity, you can purchase analogues. Moreover, the range of facade materials offered today is very diverse (Read also the article
Imitation of base
Insulation of facades with foam plastic: we do external thermal insulation with minimal time and money).
This can be decorative brick, stone or their imitation, tiles of various sizes, colors and structures, facade panels. They are often used to insulate loggias from below, balconies, and other types of external walls.
A special frame is attached to the top of the piles; it will serve as the basis for future finishing. The material you choose is attached to it.
Imitation of base
 Insulation of facades with foam plastic: we do external thermal insulation with minimal time and money).
This can be decorative brick, stone or their imitation, tiles of various sizes, colors and structures, facade panels. They are often used to insulate loggias from below, balconies, and other types of external walls.
A special frame is attached to the top of the piles; it will serve as the basis for future finishing. The material you choose is attached to it.
Imitation of base
Insulation of facades with polystyrene foam: we do external thermal insulation with minimal time and money" href=»http://pro-uteplenie.ru/mesta/fasad/50-uteplenie-fasadov-penoplastom">Insulation of facades with polystyrene foam: we do external thermal insulation with minimal costs time and money).
This can be decorative brick, stone or their imitation, tiles of various sizes, colors and structures, facade panels. They are often used to insulate loggias from below, balconies, and other types of external walls.
A special frame is attached to the top of the piles; it will serve as the basis for future finishing. The material you choose is attached to it.
Imitation of base
Note! For greater comfort in the house, it is not enough to equip its main floor. To keep warm, it is also necessary to make insulation plastic windows, doorways, walls facing outside. Only then will you get maximum results.

Swedish insulated slab: we carry out installation ourselves" href=»http://pro-uteplenie.ru/mesta/fundament/114-shvedskaya-uteplennaya-plita">Swedish insulated slab: feasible.
Base insulation methods

The easiest option is to blow everything out with foam insulation.
Let's look at how to insulate a screw foundation with each of the presented materials separately, and let's start with foam glass. As we have already said, it is produced in fairly strong blocks, which need to be worked with as with ordinary bricks. Therefore, if you decide to use foam glass, you will need a strip foundation. The foam glass base can be finished with your favorite material; it is very versatile.
We will consider ordinary and extruded polystyrene foam together, since the insulation of a house on a pile-screw foundation is no different with these materials. First you need to decide on which side of the sheathing you will attach the sheets:
If outside, then the work must be carried out before the finishing DSP boards are fixed. They are subsequently attached through foam plastic to the sheathing, the insulation and finishing sheets are in contact. Most often, insulation is carried out in several stages, so it is necessary to attach foam sheets from the inside. In this case, it is better to do this on the sheathing, and not between the guides, although the second option is easier to implement. Firstly, a ventilation gap will appear, and secondly, there will be no cold bridges, since wooden beams have significantly higher thermal conductivity than expanded polystyrene.
The polystyrene foam is glued to the adhesive foam (it is similar to polyurethane foam), the joints are naturally sealed with the same foam. Considering the fact that there will be only two attachment points for the sheet, additional fixation can be made. Along the guides, on top of the foam, you can fasten a thin wooden strip. It is attached with black self-tapping screws through the foam into the sheathing. Even with just adhesive foam, everything will hold securely, and after fixing it with slats, the insulation will definitely not go anywhere.
The easiest way is to blow out the inner surface of the base with liquid foam insulation.
After this, it does not need any finishing. Penoizol cannot be used in sheets, as they are very fragile. It should be noted that even if the base is well insulated, but the floor in the house is not, you can’t count on a positive result. For this purpose, mineral wool is used, it is laid on the lathing. The sheathing is fixed to the base of the house, which rests on screw piles. How to insulate a floor:
- a hydrobarrier is laid on the sheathing - dense polyethylene is quite suitable, not necessarily membranes;
- mineral wool is laid on top;
- Between the wool and the subfloor there is a membrane that allows steam to pass through.
Please note that steam should escape from the insulation into the room, and not vice versa. The layer of cotton wool must be at least 10 cm
If several layers are laid, then this must be done so that the joints do not coincide. This will prevent cold air from entering the house.